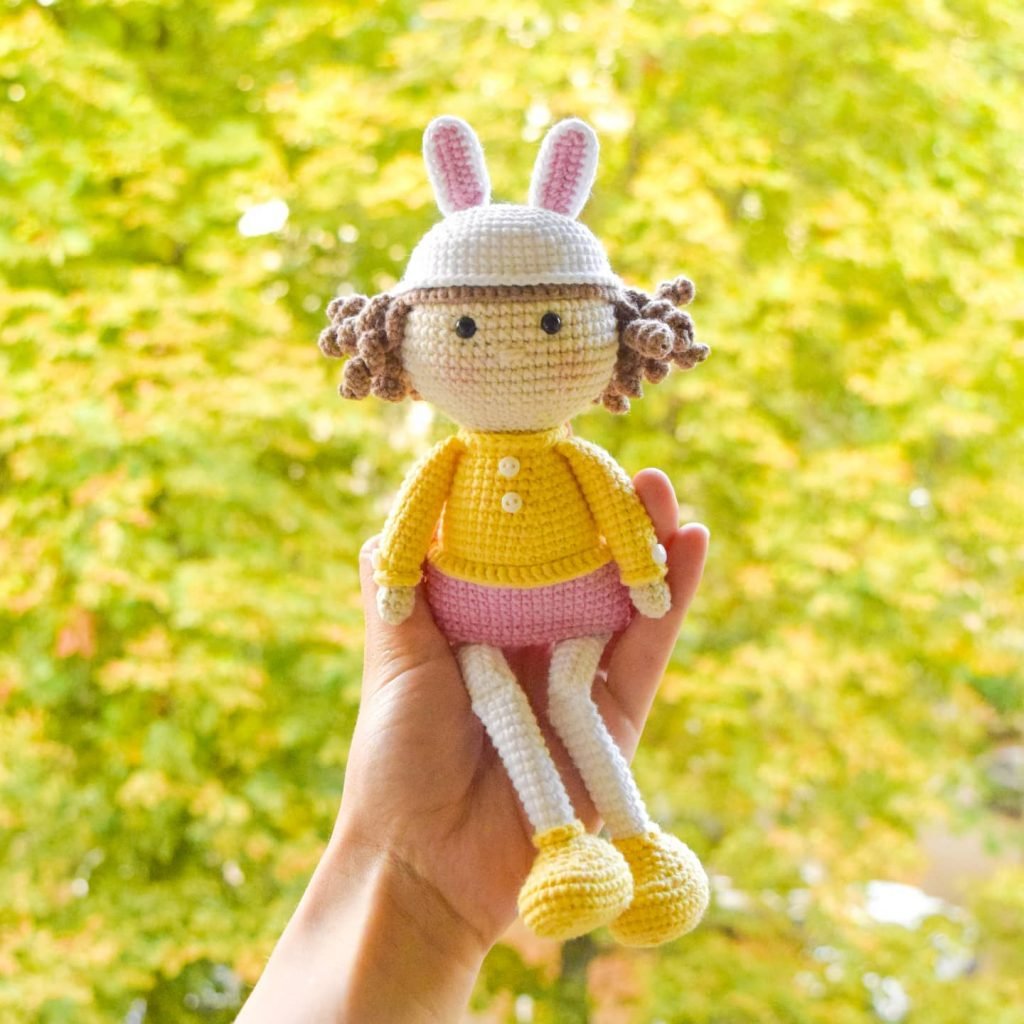
Hello amigurumi lovers and beautiful visitors, I wanted to share the free amigurumi patterns for you here. In my article I will share 1 pattern and how to make it for you. At the end of my article, I will share amigurumi patterns that can generate ideas for you.
Materials
• Yarn in 5 colors: white, beige, yellow, brown and pink.
• 2mm hook.
• 6mm eyes – 6mm white buttons (4 pieces) – Blush to add color.
• Marker – Needle
• Cardboard for soles
• Pair of scissors
Abbreviations
MR: Amigurumi Magic ring
sc : Single Crochet
inc : Increase
dec : Decrease
tr : Triple Crochet/ Treble Crochet
st: Stitch
dc : Double Crochet
hdc: Half Double Crochet
slst : Slip Stitch
ch : Chain
..in : make increase into same stitch as many as the number which is given in front of “inc” abbreviation (exp; 3inc, 4inc..).
FLO : Crochet into front loops only
BLO : Crochet into back loops only
Head
Color beige
Rnd 1: 6 sc in MR
Rnd 2: 6 inc [12]
Rnd 3: (1sc, inc)*6 [18]
Rnd 4: (2sc, inc)*6 [24]
Rnd 5: (3sc, inc)*6 [30]
Rnd 6: (4sc, inc)*6 [36]
Rnd 7: (5sc, inc)*6 [42]
Rnd 8: (6sc, inc)*6 [48]
Rnd 9: (7sc, inc)*6 [54]
Rnd 10-18: 54 sc (9 rows)
Rnd 19: (7sc, dec)*6 [48]
Rnd 20: (6sc, dec)*6 [42]
Rnd 21: (5sc, dec)*6 [36]
Rnd 22: (4sc, dec)*6 [30]
Rnd 23: (3sc, dec)*6 [24]
Slst, cut the yarn leaving a long yarn to sewing.
Place the eyes between rows 13 and 14, with a distance between them of 6 sc. Stuff the head. Embroider the nose between rows 15 and 16.
Ears for hat
It consists of two identical parts, one pink and one white.
Crochet the first part in pink.
10 ch, starting in the second ch from the hook: 8 sc, 3 sc in the last ch, continue from the other side of ch: 8 sc [19] slst, cut the yarn.
In the same way we crochet the second part, but in white, do not cut the yarn.
Put both pieces together, sc in a circle all the way around. Slst, cut the yarn leaving a long yarn to sew.
In the same way we crochet the second ear.
Hat
White color
Rnd 1: 6 sc in MR
Rnd 2: 6 inc [12]
Rnd 3: (1sc, inc)*6 [18]
Rnd 4: (2sc, inc)*6 [24]
Rnd 5: (3sc, inc)*6 [30]
Rnd 6: (4sc, inc)*6 [36]
Rnd 7: (5sc, inc)*6 [42]
Rnd 8: (6sc, inc)*6 [48]
Rnd 9: (7sc, inc)*6 [54]
Rnd 10-14: 54 sc (5 rows)
Rnd 15: FLO 54 sc [54]
Slst, cut the yarn and hide the yarn.
Hook the brown yarn to the back loops left in row 15 and crochet 54 sc.
Start weaving hair. Without cutting the yarn, ch 26, in the second ch from hook: 25 sc, sl st in row 15. Repeat this sequence 14 times, we will get 15 curlers. Now work from the front of the loop 24 sc (bangs). Weave 15 additional curlers.
At the end we will have 30 curlers and 24 sc of the bangs.
Slst, cut the yarn leaving a long yarn to sew to the head.
Sew the hat to the head. Sew the ears to the hat and color the cheeks.
Legs
We begin to crochet in yellow.
9 ch, starting in the second ch from hook:
Rnd 1: 7sc, 3sc in last ch, continue on the other side of chain 6sc, inc [18]
Rnd 2: 2inc, 4sc, 5inc, 6sc, inc [26]
Rnd 3: (sc, inc)*2, 5sc, (sc, inc)’4, 8sc, inc [33]
Rnd 4: BLO 33sc [33]
Rnd 5-6: 33sc (3 rows)
Insert the insole into the feet.
Rnd 7: 6sc, (dec, sc)*6, 9sc [27]
Rnd 8: 7sc, 6dec, 8sc [21]
Rnd 9: (5sc, dec)*3 [18]
We fill the leg as we crochet.
Rnd 10: (4sc, dec)*3 [15]
Rnd 11: (sc, dec)*5 [10]
Change to white
Rnd 12: BLO 10sc [10]
Rnd 13-24: 10sc (12 rows)
Rnd 25: Fill the leg slightly, fold it in half and join both parts with 5 sc. Now crochet in a circle: front, FLO 5sc, BLO 5sc. Total 10sc.
Rnd 26-33: 10sc (8 rows)
Stuff the leg to the end.
We fold the leg in half, ch 1 and join both parts with 5 sc. Cut the yarn and hide the yarn.
Attach the yellow yarn to the front loops of row 12 and crochet 10 sc. Crochet the second leg in the same way, just don’t cut the yarn.
Body
Rnd 34: 10 ch from second leg, we attach this to the first leg. FLO 5 sc, BLO 5 sc (10sc on the first leg). 10sc on the ch BLO 5 sc, FLO 5 sc (10sc on the second leg). 10 sc on the ch. [40]
The row start marker should be in the front.
Rnd 35: (6sc, inc)*4, (5sc, inc)*2 [46]
Rnd 36-40: 46sc (5 rows)
The new beginning of the row should be located in the middle of the back, in my case I made 15 sc more to get it.
Change to yellow
Decreases in row 41 go to the sides of the body.
Rnd 41: 10sc, dec, 22sc, dec, 10sc [44]
Rnd 42: BLO 44sc [44]
Rnd 43: 44sc [44]
Rnd 44: (9sc, dec)*4 [40]
Rnd 45: 40sc [40]
Rnd 46: (8sc, dec)*4 [36]
Rnd 47: 36sc [36]
Rnd 48: (7sc, dec)*4 [32]
Rnd 49: 32sc [32]
Rnd 50: (6sc, dec)*4 [28]
Rnd 51: 28sc [28]
Rnd 52: (5sc, dec)*4 [24]
Rnd 53: BLO 24sc [24]
Slst, cut the yarn and hide the yarn. Fill the body to the end.
Blouse: We turn the wrist down (photo). We attach the yellow yarn in the loops left in row 42 and crochet 44sc. At the end, slst cut the yarn and hide the yarn.
Neck: Attach the yellow yarn in the loops left in row 53 and crochet 24 hdc. At the end, Slst cut the yarn and hide the yarn.
Arms
Color beige
Rnd 1: 6sc in MR
Rnd 2: (sc, inc)*3 [9]
Rnd 3-4: 9sc (2 rows)
Rnd 5: (6sc, dec)*3 [6]
Change to yellow
Rnd 6: 6inc [12]
Rnd 7: BLO 12sc [12]
Rnd 8-20: 12sc (13 rows) Pad the arm slightly
Fold the arm in half and join both parts with 6 sc. Slst, cut the yarn leaving a long yarn to sewing. Attach the yellow yarn to the loops left in row 7 and crochet 12 sc.
Sew the arms to the body.
Skirt
Pink color
Ch 46, we close in a circle and spiral 7 rows of sc Slst, cut the yarn leaving a long yarn to sew to the body.
Make two buttons in front of the blouse (see cover photo) and one button to the side on each arm.
Congratulations !
Feel free to tag me (@freeamigurumii) in your photos on Instagram or Facebook if you’d like!


