Hello amigurumi lovers and beautiful visitors, I wanted to share the free amigurumi patterns for you here. In my article I will share 1 pattern and how to make it for you. At the end of my article, I will share amigurumi patterns that can generate ideas for you.
Instruments and materials
- 0.75 and 1.00 mm hooks
- Orange, flesh-colored and white yarn. Also mouline DMC 798 (navy blue), DMC
B5200 (white) yarn - Pieces of orange, yellow and red carded merino wool
- Sewing needle
- Stuffing material
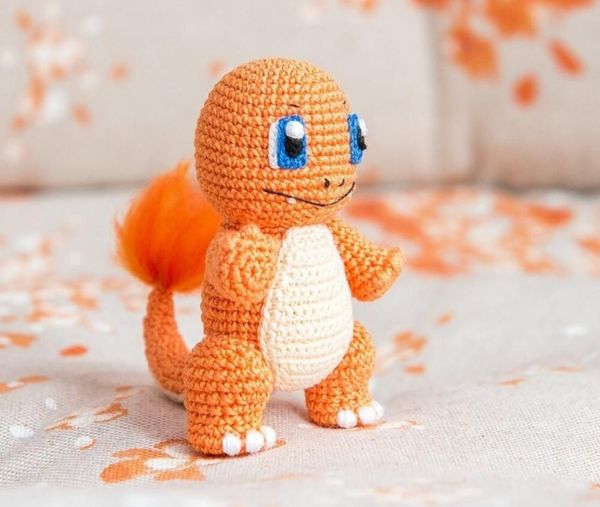
Charmander – character from popular franchise “Pokemon” that is managed by The
Pokémon Company, a Japanese consortium between Nintendo, Game Freak, and
Creatures.
This toy was crocheted with “Garden 10” yarn. This is 100% cotton, 280m/50g. To
create a toy with a height of 8.5 cm you must crochet with single yarn using a 1.00
mm hook. To crochet the eyes you should use a 0.75 mm hook. You can use the same
mouline yarn as was mentioned in materials or any matching color yarn, but you have
to make it two times thinner than the main yarn to crochet the eyes. The flame on the
tail end is made of carded merino wool combed sliver with a 18 mic thickness. The
stuffing material used in this toy is polyester wadding.
Abbreviations
Ch chain
Sl slip stitch
Sc single crochet
Dc double crochet
INC increase
INVDEC invisible decrease
HDc half double crochet
INCHDc 2HDc crocheted in one stitch
(INCHDc: 2HDc crocheted in one stitch,
1HDc, one of which is crocheted with
*1HDc) main color and the second
one with additional color
Tip 1
The toy must be crocheted with tight stitches, to be sure that there won’t be any holes through which stuffing material can be seen.
Tip 2
To keep track can be seen. of the beginning of the row, use a marker. Pin marker to the last loop of the row. Every new row must be finished with a loop at the marker.
All amigurumi toys are crocheted with tight stitches. Avoid small holes when stretching crochet fabric, if there are some tiny holes, use a smaller size hook. To avoid seams, all details are crocheted in a spiral without slip stitch and lifting loops. There is a chance that you will lose the beginning of the row; to avoid this, use a marker. It can be a colored pin or thread of contrasting color.
Head
With orange yarn, 1.00 mm hook
1 row 6Sc in magic circle (6)
2 row 6INC (12)
3 row (1Sc, INC) repeat 6 times (18)
4 row (2Sc, INC) repeat 6 times (24)
5 row (3Sc, INC) repeat 6 times (30)
6 row (4Sc, INC) repeat 6 times (36)
7 — 8 rows Sc in each Sc around (36)
9 row (11Sc, INC) repeat 3 times (39)
10 — 11 rows Sc in each Sc around (39)
12 row 11Sc, INC, 4Sc, INVDEC, 4Sc, INVDEC,4Sc, INC, 10Sc (39)
13 row 12Sc, INC, 2Sc, INC, 1Sc, INC, 4Sc, INC, 1Sc, INC, 2Sc, INC, 11Sc (45)
14 row 22Sc, 2INC (nose), 21Sc (47)
15 row 22Sc, 2INVDEC (nose), 21Sc, 1Sc (extra stitch made to help conceal the unshapely edges) (45)
Tip 3
To avoid uneven edges, all details that are made in spiral technique must be finished with a slip stitch.
Head
16 row 5Sc, INVDEC, 6Sc, INVDEC, 5Sc, INVDEC, 6Sc, INVDEC, 5Sc, INVDEC, 6Sc, INVDEC (39)
17 row 4Sc, INVDEC, 5Sc, INVDEC, 4Sc, INVDEC, 5Sc, INVDEC, 4Sc, INVDEC, 5Sc, INVDEC (33)
18 row 3Sc, INVDEC, 4Sc, INVDEC, 3Sc, INVDEC, 4Sc, INVDEC, 3Sc, INVDEC, 4Sc, INVDEC (27)
Stuff detail with stuffing material, continue crocheting.
19 row 2Sc, INVDEC, 3Sc, INVDEC, 2Sc, INVDEC, 3Sc, INVDEC, 2Sc, INVDEC, 3Sc, INVDEC (21)
20 row 1Sc, INVDEC, 2Sc, INVDEC, 1Sc, INVDEC, 2Sc, INVDEC, 1Sc, INVDEC, 2Sc, INVDEC (15)
21 row INVDEC, 1Sc, 2INVDEC, 1Sc, 2INVDEC, 1Sc, INVDEC (9)
22 row (1Sc , INVDEC) repeat 3 times (6), Sl Tighten all stitches. Cut the yarn, hiding the end inside the head.
Tip 4
When you stuff the detail, make sure that the nose is stuffed tight so that it can hold its shape.
Body
With orange yarn, 1.00 mm hook
1 row 6Sc in magic circle (6)
2 row 6INC (12)
3 row (1Sc, INC) repeat 6 times (18)
4 row (2Sc, INC) repeat 6 times (24)
5 row (3Sc, INC) repeat 6 times (30)
6 row (4Sc, INC) repeat 6 times (36)
7 — 10 rows Sc in each Sc around (36)
11 row (10Sc, INVDEC) repeat 3 times (33)
12 — 13 rows Sc in each Sc around (33)
14 row (4Sc, INVDEC, 5Sc) repeat 3 times (30)
15 — 16 rows Sc in each Sc around (30)
17 row (8Sc, INVDEC) repeat 3 times (27)
18 row Sc in each Sc around (27)
19 row (7Sc, INVDEC) repeat 3 times (24), Sl
Cut the yarn, leave a long end for sewing.
Stuff detail with stuffing material.
Forelegs
With orange yarn, 1.00 mm hook
1 row 6Sc in magic circle (6)
2 row 6INC (12)
3 row INC, 3Sc, 4INC, 4Sc (17)
4 row 17Sc, 1Sc (extra stitch made to help conceal the unshapely edges) (17)
5 row 5Sc, 4INVDEC, 4Sc (13)
6 — 9 rows Sc in each Sc around (13)
10 row INVDEC, 11Sc (12)
Stuff detail with stuffing material, continue crocheting.
11 row Sc in each Sc around (12)
12 row 6INVDEC (6), Sl
Cut the yarn, leave a long end for sewing.
Make 2 details.
Forelegs
The claws should be situated in the place where you crocheted 4INC (3rd row) and 4INVDEC (5th row).
Connect orange yarn to the center of INC and INVDEC and embroider the claw through the 4th row with a few stitches. The first claw is ready. Embroider two more claws on both sides of the first claw.
Fasten and cut the yarn, hiding the end inside the detail.
Repeat with the second foreleg.
Hind legs
With orange yarn, 1.00 mm hook
1 row 7Sc in magic circle (7)
2 row 7INC (14)
3 row 5Sc, 4INC, 5Sc (18)
4 row 18Sc, 1Sc (extra stitch made to help conceal the unshapely edges) (18)
5 row 5Sc, 4INVDEC, 5Sc (14)
6 row Sc in each Sc around (14)
7 row 6Sc, 2INC, 6Sc (16)
8 row 7Sc, 2INC, 7Sc (18)
9 row 8Sc, 2INC, 8Sc (20)
10 row Sc in each Sc around (20)
11 row 8Sc, 2INVDEC, 8Sc (18)
Stuff detail with stuffing material, continue crocheting.
12 row (1Sc, INVDEC) repeat 6 times (12)
13 row 6INVDEC (6), Sl
Cut the yarn, leave a long end for sewing.
Make 2 details.
Squish the top of the hind legs as shown on the photo.
Hind legs
The claws should be situated in the place where you crocheted 4INC (3rd row) and 4INVDEC (5th row).
Connect white yarn to the center of INC and INVDEC and embroider the claw through the 4th row with a few stitches. The first claw is ready. Embroider two more claws on both sides of the first claw.
Fasten and cut the yarn, hiding the end inside the detail.
Repeat with the second hind leg.
Tail
1 row 3Sc in magic circle (3)
2 row INC, 2Sc (4)
3 row INC, 3Sc (5)
4 row INC, 2Sc, 1HDc, 1Sc (6)
Connect flesh-colored yarn in the next row where you crochet second
HDc from first INC. Next Sc’s in fleshcolored yarn will be marked with a “*” sign.
5 row 1HDc, 3Sc, (INCHDc: 1HDc, *1HDc), INCHDc (8)
6 row 1HDc, 3Sc, 1HDc, *2HDc, 1HDc (8)
7 row 1HDc, 4Sc, 1HDc, *INCHDc, (INCHDc: *1HDc, 1HDc) (10)
8 row 1HDc, 4Sc, 1HDc, *4HDc (10)
9 row 2HDc, 4Sc, 1HDc, *1HDc, *2INCHDc (12)
10 row 2HDc, 5Sc, *5HDc (12)
11 row 2HDc, 5Sc, 1HDc, *2HDc, *2INCHDc (14)
Tip 5
Take a look at “Abbreviations” on the third page, to understand the tail’s pattern correctly.
Tail
12 row 2HDc, 6Sc, 1HDc, *5HDc (14)
13 row 2HDc, 6Sc, 1HDc, *3HDc, *2INCHDc (16)
14 row 2HDc, 7Sc, 1HDc, *6HDc (16)
15 row 2HDc, 7Sc, 2HDc, *3HDc, *2INCHDc (18)
16 row 3HDc, 9Sc, *6HDc (18)
17 row 11HDc (11), Sl (unfinished row).
Cut the yarn, leave a long end of both colors for sewing.
Stuff the tail with stuffing material, bend it a little as shown on the photo.
Stomach
With flesh-colored yarn, 1.00 mm hook
Ch6
1 row Sc in second stitch, 4Sc, Ch turn(5)
2 row INC, 3Sc, INC, Ch turn (7)
3 row 7Sc, Ch turn (7)
4 row INC, 6Sc, Ch turn (8)
5 row 8Sc, Ch turn (8)
6 row 7Sc, INC, Ch turn (9)
7 row 9Sc, Ch turn (9)
8 row INC, 8Sc, Ch turn (10)
9 row INC, 9Sc, Ch turn (11)
10 — 12 rows 11Sc, Ch turn (11)
13 row 9Sc, INVDEC, Ch turn (10)
14 row 10Sc, Ch turn (10)
15 row INVDEC, 8Sc, Ch turn (9)
16 row 9Sc, Ch turn (9)
17 row 7Sc, INVDEC, Ch turn (8)
18 row 8Sc, Ch turn (8)
19 row INVDEC, 6Sc, Ch turn (7)
20 — 22 rows 7Sc, Ch turn (7)
23 row 7Sc, crochet the whole circumference of the detail: 1Sc (in the same stitch, e.g. in 7th Sc), 22Sc
(into transverse loops) , INC (corner), 3Sc, INC (corner), 24Sc (into transverse loops) (61), Sl
Cut the yarn, leave a long end for sewing.
Eyes
With navy blue yarn (three threads of DMC 798), 0.75 mm hook
First part
Ch8
1 row Dc in third stitch, 5Dc (6)
Cut the yarn, leave a long end for sewing.
Make 2 details.
With white yarn (three threads of DMC B5200), 0.75 mm hook
Second part
Ch6
Cut the yarn, leave a long end for sewing.
Make 2 details.
Pupils
With black yarn (two threads of DMC 310), 0.75 mm hook
Ch3
1 row Sc in second stitch, 3Sc in the next stitch (crochet round), 2Sc in the next stitch (that already has the very first single crochet) (6)
Cut the yarn, leave a long end for sewing.
Make 2 details.
Assembly
Put the body under the bottom center of the head, adjusting it by the nose.
Sew the body with the end of orange yarn that we left before.
Fasten and cut the yarn, hiding the end inside the body.
Assembly
Place the stomach on the front part of the body so that its bottom part reaches the tail connection place and fasten it with pins. Sew the stomach with the end of flesh-colored yarn that we left before. If you can see orange color through the stomach, hide it by guiding flesh-colored yarn through these holes. Fasten and cut the yarn, hiding the end inside the body.
Assembly
Place the hind legs symmetrically to the bottom part of the body so that the squished parts lean against the body, and fasten them with pins.
Sew the hind legs with the end of orange yarn that we left before.
Fasten and cut the yarn, hiding the ends inside the body.
You don’t need to make it balanced as Charmander will be standing leaning on his tail.
Assembly
Place the forelegs on each sides of the body, a little bit lower than the connection of body and head. Raise one of the hands and fasten them with pins.
Sew the forelegs with the ends of orange yarn that we left before.
Fasten and cut the yarn, hiding the end inside the body.
Assembly
Place the tail at the back of the body so that its color is perfectly matched with the bottom part of the stomach and fasten it with pins.
Sew the tail with the ends of fleshcolored and orange yarn, keeping the color
Fasten and cut the yarn, hiding the ends inside the body.
Assembly
Put both parts of the eye against each other as shown on the photo. Fasten and cut the unnecessary ends of yarn from the beginning of crocheting on the back sides of the details. Split the second end of white yarn into strands and leave only one strand, because we will need very thin yarn for sewing. Sew both parts of the eye along the back side so that the seem is invisible. Do not cut the yarn, you will need the end of each color to sew the eye to the head. Repeat with the second eye. Place the eyes symmetrically a bit higher than the nose and fasten them with pins. Sew the eyes to the head along the whole circumference keeping the color of yarn.
Assembly
Place and sew the pupils on the center of the navy blue part of the eyes. Connect thin black
yarn and embroider the eyebrows, nostrils and mouth.
Embroider sparkles on the edge of both eyes and two tiny teeth making a few stitches with white yarn.
All yarns must be fastened, cut and hidden inside the head.
Assembly
Take carded wool in all three colors. Take every color of wool and split them into thin strands. Put together several strands of different colors.
Insert the hook into the end of the tail. Take a strand that we prepared before. Pull the strand into the stitch so that the length of the strand is equal on both sides.
Prepare the second strand of wool of different colors. Insert the hook perpendicular to the first strand.
Assembly
Pull the strand in the same way as you did the first time.
Cut the loops.
Comb the wool, in this way you will comb out unnecessary wool.
Pull the wool together, cut it if necessary and make it look like a fire flame.
Congratulations, your Charmander is ready!
Feel free to tag me (@freeamigurumii) in your photos on Instagram or Facebook if you’d like!