Hello amigurumi lovers and beautiful visitors, I wanted to share the free amigurumi patterns for you here. In my article I will share 1 pattern and how to make it for you. At the end of my article, I will share amigurumi patterns that can generate ideas for you.
Materials
Worsted weight yarn in the following colors:
Peach (I used Lily Sugar N’ Cream Scents in Chamomile)
Heather (I used Loops and Threads Impeccable in Heather)
White (I used Loops and Threads Impeccable in White)
Red (I used Caron Simply Soft in Autumn Red)
Pumpkin (I used Loops and Threads Impeccable in Pumpkin)
3.0 mm Crochet Hook
Safety Eyes (I used 6.0 mm)
Poly-fil or any Polyester Stuffing of your choice
Yarn Needle
Stitch Markers
Scissors
Stitches & Abbreviations
st/sts – stitch/stitches
ch – chain
slst – slip stitch
sc – single crochet (using the yarn under method)
sc inc – single crochet increase, 2 single crochets in one stitch
sc dec – single crochet decrease, single crochet 2 stitches together
hdc – half double crochet
dc – double crochet
BLO – back loops only
FLO – front loops only
Notes
I made this amigurumi doll using the “Yarn Under Single Crochet”
technique. This technique makes the stitches tighter and appears
more aligned.
I also used a half-color changing technique to achieve cleaner lines
when changing colors from one row to another.
When working on the hairpiece, I used the underside of the piece
as the “outside” or the side that is showing. The curls of the
strands will follow a natural curl towards the face.
I used the invisible fasten-off method to neatly finish the work
before I weaved in my ends.
Head
Using a 3.0 mm crochet hook with peach yarn…
Round 1: Magic Circle with a base of 6 sc (6 sts)
Round 2: Sc inc in each st around (12 sts)
Round 3: [Sc, sc inc] x 6 times (18 sts)
Round 4: [Sc, sc inc, sc] x 6 times (24 sts)
Round 5: [3 sc, sc inc] x 6 times (30 sts)
Round 6: [2 sc, sc inc, 2 sc] x 6 times (36 sts)
Round 7: [5 sc, sc inc] x 6 times (42 sts)
Round 8-14: Sc in each st around (42 sts)
Round 15: [5 sc, sc dec] x 6 times (36 sts)
Round 16: [2 sc, sc dec, 2 sc] x 6 times (30 sts)
Round 17: [3 sc, sc dec] x 6 times (24 sts)
Put in your safety eyes. I put mine between rows 10 and 11, about 7
stitches apart. Stuff the head with poly-fil before the opening gets too
small.
Round 18: [Sc, sc dec, sc] x 6 times (18 sts)
Round 19: [Sc, sc dec] x 6 times (12 sts)
Round 20: Sc BLO in each st around (12 sts)
Round 21-23: Sc in each st around (12 sts)
Cut and fasten off. Stuff firmly and push rows 20-23 inside the head to
create a tunnel and a hole for the neck to go into later.
Arms
Using a 3.0 mm crochet hook with peach yarn…
Round 1: Magic Ring with a base of 6 sc (6 sts)
Change to white yarn…
Round 2-5: Sc in each st around (6 sts)
Cut and fasten off.
Legs and Body
Using a 3.0 mm crochet hook with peach yarn…
Round 1: Magic Ring with a base of 6 sc (6 sts)
Round 2: [2 Sc, sc inc] x 2 times (8 sts)
Round 3-4: Sc in each st around (8 sts)
Change to red yarn…
Round 5-7:Sc in each st around (8 sts)
Cut and fasten off the first leg.
Repeat rounds 1-7 to make a second leg. Do not cut or fasten off,
instead, finish off with a Ch 2.
Round 8: Join the second leg with the first leg. 8 sc around the first
leg, 2 sc along the ch, 8 sc around the second leg, 2 sc along the other
side of the ch (20)
Round 9: Sc in each st around (20 sts)
Change to white yarn…
Round 10-12: Sc in each st around (20 sts)
Round 13: 4 sc BLO, 6 sc around the first arm, 10 sc BLO, 6 sc around
the second arm, 6 sc BLO (32 sts)
Round 14: Sc dec in each st around (16 sts)
Round 15: Sc dec in each st around (8 sts)
Change to peach yarn…
Round 16-20: Sc in each st around (8 sts)
Cut and leave a long tail to attach the body to the head by threading
the yarn tail through the hole on the bottom of the head. Then sew it to
the top of the head and then sew it to the neck again to secure it. Do
this a few times to make sure your head is secured.
Shirt
Using a 3.0 mm crochet hook and white yarn…
Work on the front loops from round 13 with the doll legs facing away
from you.
Round 1: Sc join to the FLO from round 13, sc in each st around (20
sts)
Round 2-5: Sc in each st around (20 st)
Cut and fasten off invisibly.
Hairpiece / Wig
Using a 3.0 mm crochet hook and heather yarn…
Round 1: Magic Circle with a base of 6 sc (6 sts)
Round 2: Sc inc in each st around (12 sts)
Round 3: [Sc, sc inc] x 6 times (18 sts)
Round 4: [Sc, sc inc, sc] x6 times (24 sts)
Strand 1: Ch 16, sc into the 2nd ch from the hook and up the ch, then
slst into the next st on round 4 (15 sts)
Strand 2: Ch 22, sc into the 2nd ch from the hook and up the ch, then
slst into the next st on round 4 (21 sts)
Strand 3: Ch 6, sc into the 2nd ch from the hook and up the ch, then
slst into the next st on round 4 (5 sts)
Strand 4: Ch 8, sc into the 2nd ch from the hook and up the ch, then
slst into the same st as the previous strand on round 4 (7 sts)
Strand 5: Ch 6, sc into the 2nd ch from the hook and up the ch, then
slst into the next st on round 4 (5 sts)
Strand 6: Ch 22, hdc into the 3rd ch from the hook and up the ch, skip
1, then slst into the next st on round 4 (21 sts)
Strand 7: Ch 16, hdc into the 3rd ch from the hook and up the ch, skip
1, then slst into the next st on round 4 (15 sts)
Strand 8-16: Ch 22, hdc into the 3rd ch from the hook and up the ch,
skip 1, then slst into the next st on round 4 (20 sts)
Cut and fasten off with a long strand to sew the hairpiece onto the
head. Alternatively, you can use some heavy-duty glue to fix it onto the
head.
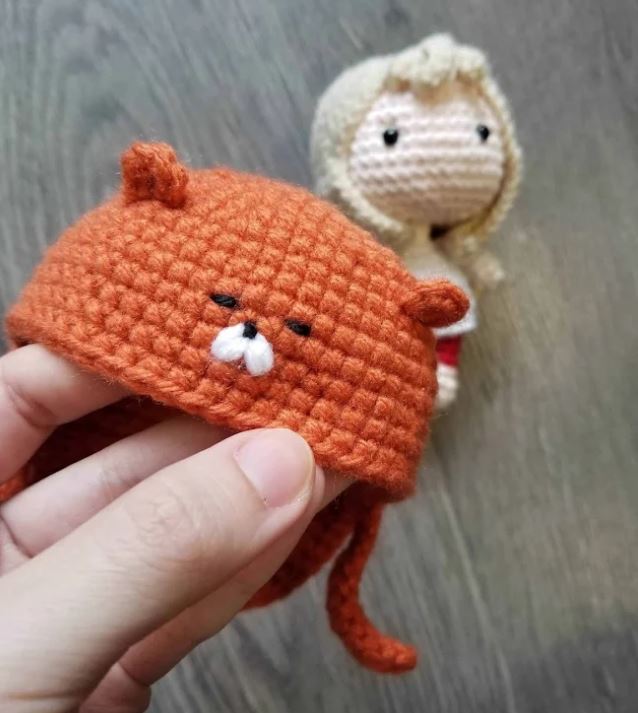
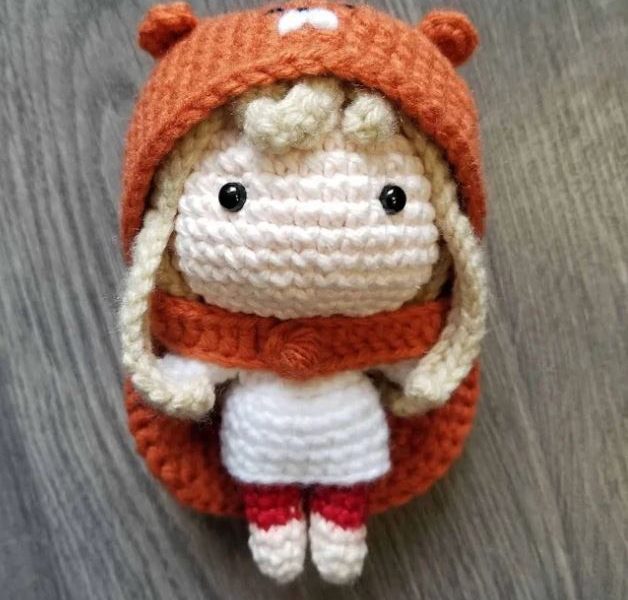
Hamster Hoodie
Using a 3.0 mm crochet hook and pumpkin yarn…
Round 1: Magic ring with a base of 6 sc (6 sts)
Round 2: Sc inc in each st around (12 sts)
Round 3: [Sc, sc inc] x 6 times (18 sts)
Round 4: [Sc, sc inc, sc] x 6 times (24 sts)
Round 5: [3 Sc, sc inc] x 6 times (30 sts)
Round 6: [2 sc, sc inc, 2 sc] x 6 times (36 sts)
Round 7: [5 sc, sc inc] x 6 times (42 sts)
Round 8: [3 sc, sc inc, 3 sc] x 6 times (48 sts)
Round 9: [7 sc, sc inc] x 6 times (54 sts)
Round 10-12: Sc in each st around (54 sts)
Row 13-22: Ch 1, turn, 14 sc (14 sts)
Round 23: 10 sc along the edges of rows 13 and 22, 40 sc around the
hood, 10 sc along the edges of rows 13 and 22 on the other side, 14 sc
(74 sts)
Round 24: 10 sc, [3 sc, sc dec, 3 sc] x 5 times, 24 sc (69 sts)
Round 25: Sc in each st around (69 sts)
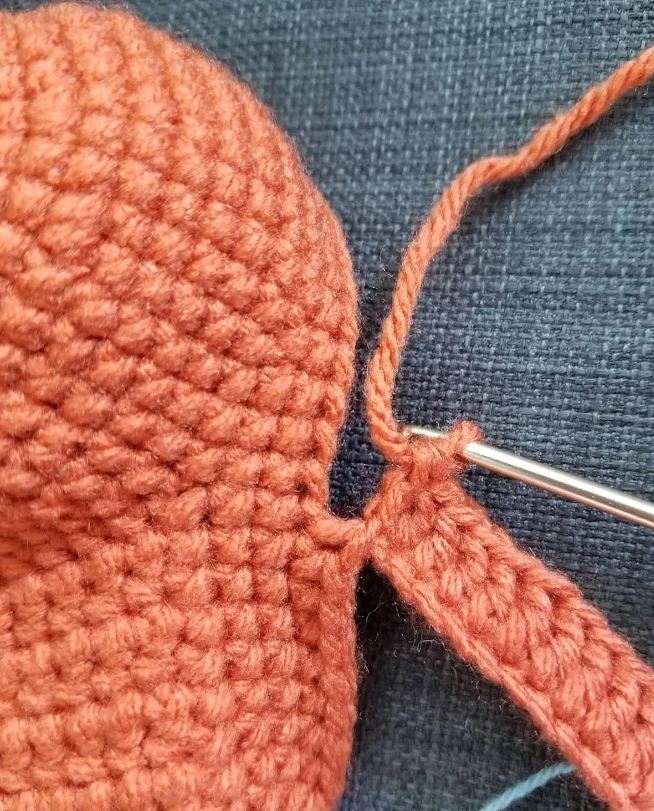
Round 26: 10 sc. First strap: Ch 11, dc into the 3rd ch from the hook
and into each ch across, 1 dc on the side of the last sc on the hood (as
seen in the pic below). Skip 1, 33 sc. Second Strap: Ch 14, dc into the
5th ch from the hook and into each ch across, 1 dc on the side of the
last sc on the hood. Skip 1, 24 sc.
Cut and fasten off invisibly to hide the end neatly.
Hamster Hoodie Ears
Using a 3.0 mm crochet hook and pumpkin yarn…
Round 1: Magic Ring with a base of 5 sc (5 sts)
Cut and fasten off, leaving a strand to sew onto the hamster hoodie.
To add some finishing touches, use some white yarn and black yarn to
embroider a face onto the hamster hoodie
Feel free to tag me (@freeamigurumii) in your photos on Instagram or Facebook if you’d like!
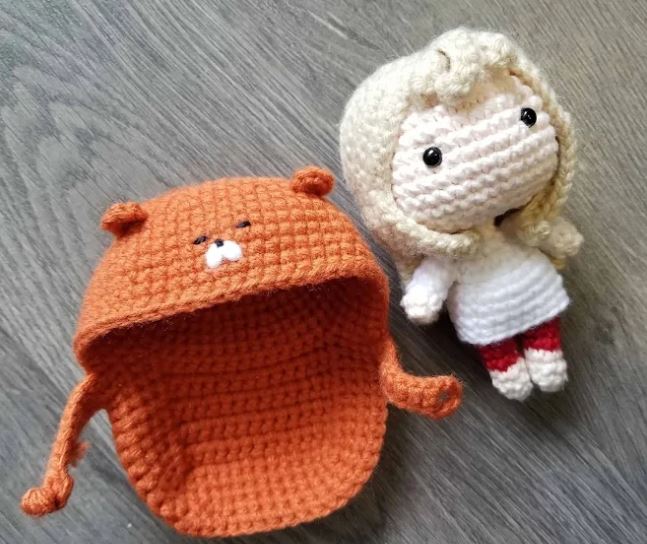
All Finished.