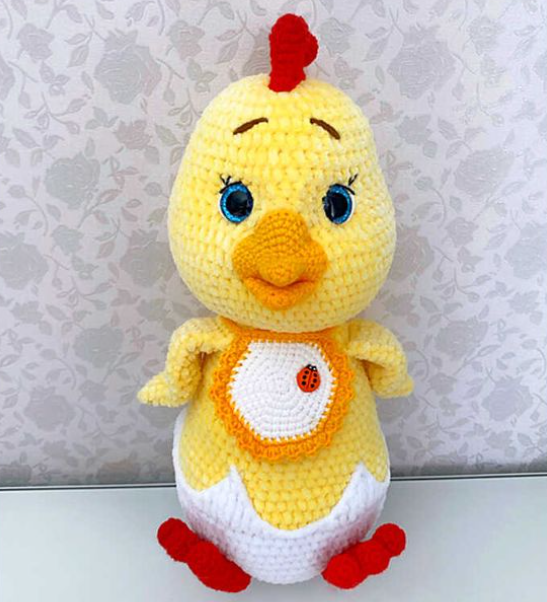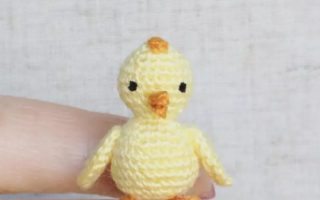
Hello amigurumi lovers and beautiful visitors, I wanted to share the free amigurumi patterns for you here. In my article I will share 1 pattern and how to make it for you. At the end of my article, I will share amigurumi patterns that can generate ideas for you.
Materials:
1. YarnArt Jeans yarn ( 50% cotton / 50% acrylic 50g / 160m ) yellow ( 67 ), blue ( 75 ),
green ( 79 ), white ( 62 ) colors, a little orange yarn for the beak and pink yarn
for cheeks
2. Filler ( Hallofiber )
3. 2.0 mm hook
4. Black eye semi-buses 10 mm in diameter
5. Glue
6. Black sewing thread for muzzle
7. Thick needle for stitching parts
Symbols:
k.a. — amigurumi ring;
v.p. — air loop;
v.p.p. — air boom;
ss — connection column;
Satn — column without caption;
psn — half-column with nakid;
sn — cloak column;
pr — increase ( 2 loops in 1 );
ub — decrease ( 2 loops together );
zpp — rear half-belt;
Ppp — front semi-pet
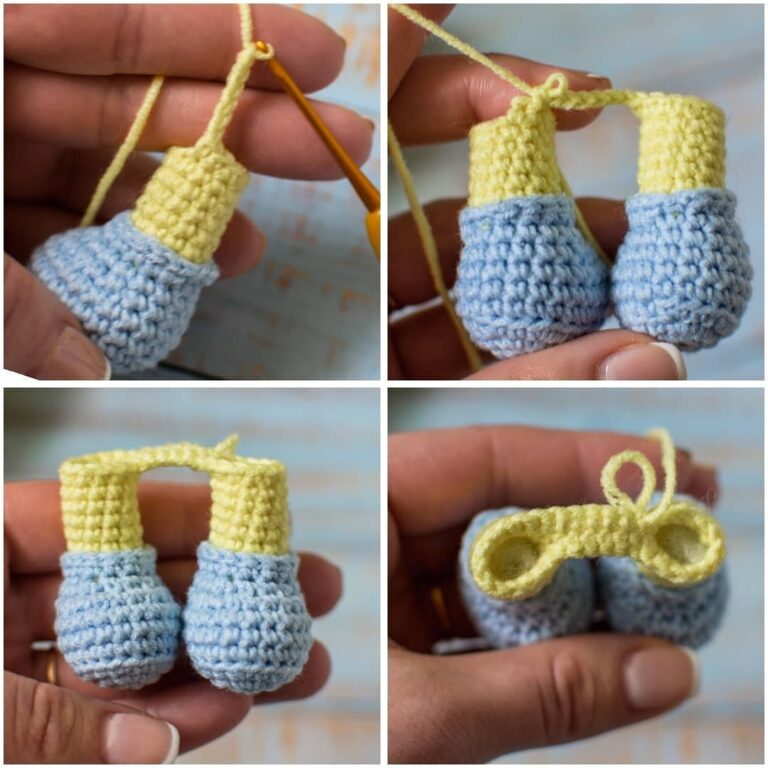
Legs ( 2 details )
We begin work with a blue thread. We fill tightly as knitting.
We collect a chain of 5 percentage points + 1 percentage point.
We begin knitting with the 2nd loop from the hook, knit on both sides of the chain, forming a collapse.
1: 4 Sat, 3 Sat in the last loop, on the other side of the chain: 3 Sat, pr ( 12 )
2: pr, 3 Sat, 3 pr, 3 Sat, 2 pr ( 18 )
3: 1 Sat, pr, 3 Sat, ( 1 Sat, pr ) * 3, 3 Satn, ( 1 Sat, pr ) * 2 ( 24 )
4: 24 Sat for ZPP
5-6: 24 Sat ( 2 rows )
7: 2 Satn, Ub, ( 1 Sat, UB ) * 5, 5 Sat ( 18 )
8: 5 Sat, 3 UB, 7 Sat ( 15 )
Change the thread to yellow.
9: knit for ZPP 4 Satn, 3 UB, 5 Satn ( 12 )
10-15: 12 Sat ( 6 rows )
We cut the thread and fix it.
We knit the second leg in a similar way, end the row, having tied an additional 4 Sat.
We connect the blue thread to the first free 8th row semi-petula and knit the top
a spiral boot for the ppp.
1: 15 Sat
2:15 ss
Cut the thread, fix it.
Body
From the second leg we type a chain of 6 percentage points, we introduce the hook into the 11th column of the last row
first legs and knit in a circle.
16: 12 Sat on the first leg, 6 Sat on one side of the chain, 12 Sat on the second leg, 6 Sat on
to the other side of the chain ( 36 )
17: ( 5 Sat, pr ) * 6 ( 42 )
18: 14 Satn, ( 1 Sat, pr ) * 3, 15 Satn, ( 1 Satn, pr ) * 3, 1 Sat ( 48 )
19: ( 7 Sat, pr ) * 6 ( 54 )
20-21: 54 Sat ( 2 rows )
Change the thread to blue.
22: 54 Sat
23: 54 Sat for ZPP
Change the thread to green.
24: 54 Sat for ZPP
Change the thread to white.
25: ( 7 Satn, Ub ) * 6 ( 48 )
Change the thread to blue.
26: 48 Satn
Change the thread to green.
27: 3 Sat, UB, ( 6 Sat, UB ) * 5, 3 Sat ( 42 )
Change the thread to white.
28: 42 Sat
Change the thread to blue.
29: ( 5 Satn, Ub ) * 6 ( 36 )
Change the thread to green.
30: 36 Sat
Change the thread to white.
31: 5 Satn, Ub, ( 10 Satn, UB ) * 2, 5 Satn ( 33 )
Change the thread to blue.
32: 33 Sat
Change the thread to green.
33: ( 9 Sat, UB ) * 3 ( 30 )
Change the thread to white.
34: 30 Satn
Change the thread to blue.
35: 4 Sat, UB, ( 8 Sat, UB ) * 2, 4 Sat ( 27 )
Change the thread to green.
36: 27 Satn
Change the thread to white.
37: ( 7 Satn, Ub ) * 3 ( 24 )
Change the thread to yellow.
38: 24 Sat for ZPP
39: 24 Sat
Cut the thread, leaving a long end for sewing.
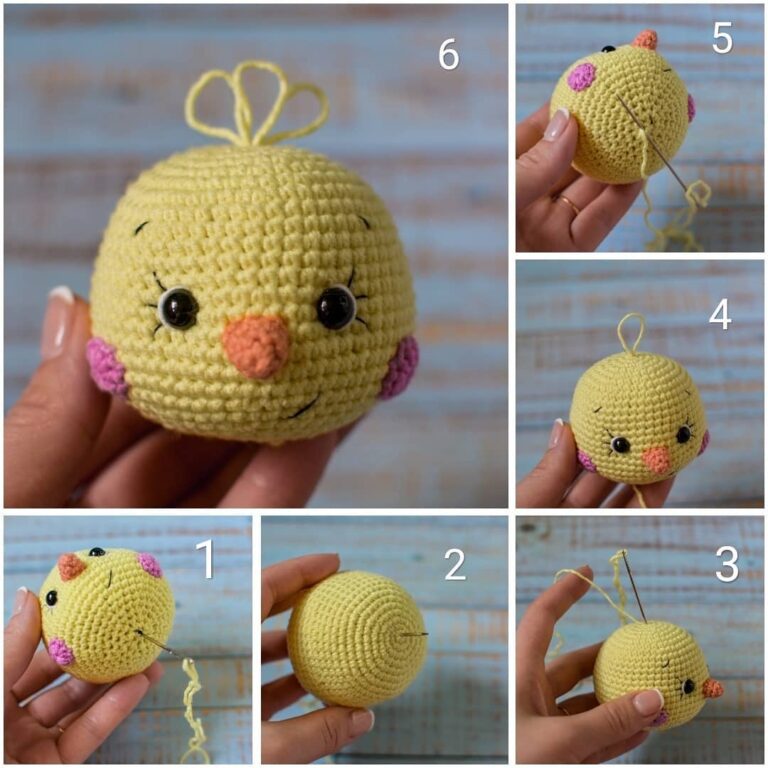
Head
We knit the thread of the main color. We fill tightly as knitting.
1: 6 Sat in KA ( 6 )
2: 6 pr ( 12 )
3: ( 1 Sat, pr ) * 6 ( 18 )
4: 1 Sat, pr, ( 2 Sat, pr ) * 5, 1 Sat ( 24 )
5: ( 3 Sat, pr ) * 6 ( 30 )
6: 2 Satn, pr, ( 4 Sat, pr ) * 5, 2 Sat ( 36 )
7: ( 5 Sat, pr ) * 6 ( 42 )
8: 3 Sat, pr, ( 6 Sat, pr ) * 5, 3 Sat ( 48 )
9-12: 48 Sat ( 4 rows )
13: ( 7 Sat, pr ) * 6 ( 54 )
14: 4 Sat, pr, ( 8 Sat, pr ) * 5, 4 Sat ( 60 )
15-19: 60 Sat ( 5 rows )
20: 4 Sat, UB, ( 8 Sat, UB ) * 5, 4 Sat ( 54 )
21: ( 7 Satn, Ub ) * 6 ( 48 )
22: 3 Sat, UB, ( 6 Sat, UB ) * 5, 3 Sat ( 42 )
23: ( 5 Satn, Ub ) * 6 ( 36 )
24: 2 Sat, UB, ( 4 Sat, UB ) * 5, 2 Sat ( 30 )
25: ( 3 Satn, Ub ) * 6 ( 24 )
26: 1 Sat, Ub, ( 2 Sat, UB ) * 5, 1 Sat ( 18 )
27: ( 1 Sat, UB ) * 6 ( 12 )
28: 6 UB ( 6 )
We pull the hole, hide the thread inside the part.
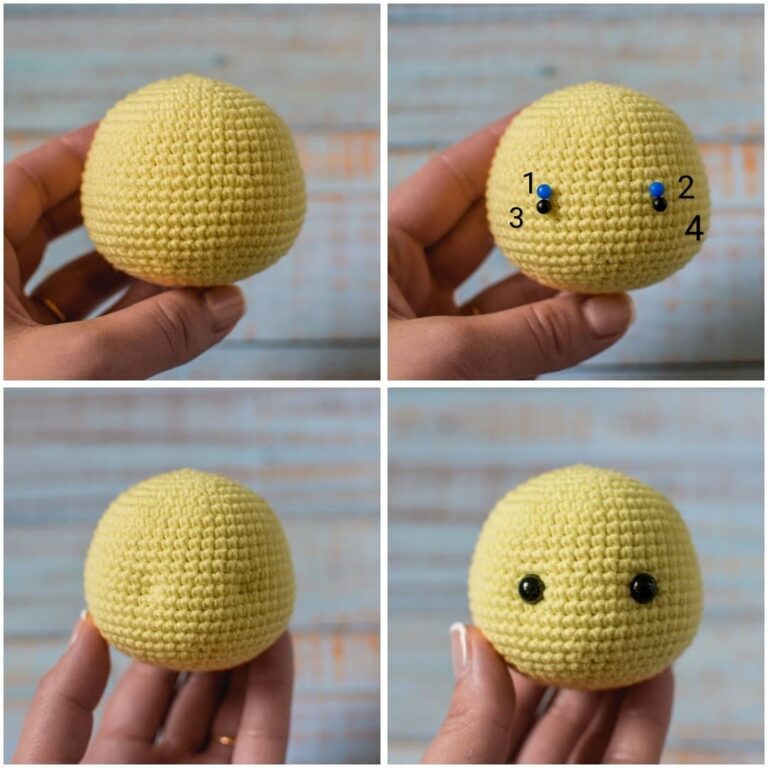
We make a hood for the peephole.
To do this, we outline points 1 and 2 between 14 and 15 rows at a distance of 10 Satn and points 3 and 4
between 15 and 16, right below points 1 and 2 ( as shown in the photo ).
Now we introduce the needle into the head, fix the thread and display it at point 1, then enter it into
head at point 3 and output at point 2, pull the thread.
Again we insert the needle into the head at point 4 and display at point 1, tighten the thread. Repeat
this movement 2-3 times. We fix the thread, crop and hide it inside the head.
The next step we glue the eyes with a glue gun. Then a white thread
embroider eye proteins, embroider eyelashes and eyebrows with black thread.
Beak
We knit a orange thread.
1: 6 Sat in KA ( 6 )
2: 6 Sat
3: ( 1 Sat, pr ) * 3 ( 9 )
Cut off the thread, leaving a long end for sewing.
Sew the beak between 15 and 18 near the head.
Cheeks ( 2 details )
In the spacecraft, we knit 2 bp, 10 psn, ss in the 2nd century.
Cut off the thread, leaving a long end for sewing.
Sew cheeks between 17 and 21 near the head.
With a black thread we embroider a smile.
We make a crest.
We introduce a needle in the lower part of the head, fix the thread and bring it to the top of the head in the ring
amigurumi. Again we introduce the needle into the head into the amigurumi ring, draw the thread at the bottom
heads, leaving a small loop on the top of the head. Fasten the bottom
heads so that the loops do not run away.
We repeat this movement 2 more times. Bant
We form an amigurumi ring, knit 3 vp, 3 sn, 3 vp, ss, 3 vp, ss, we tighten.
We wrap the bow a little and sew it to the head.
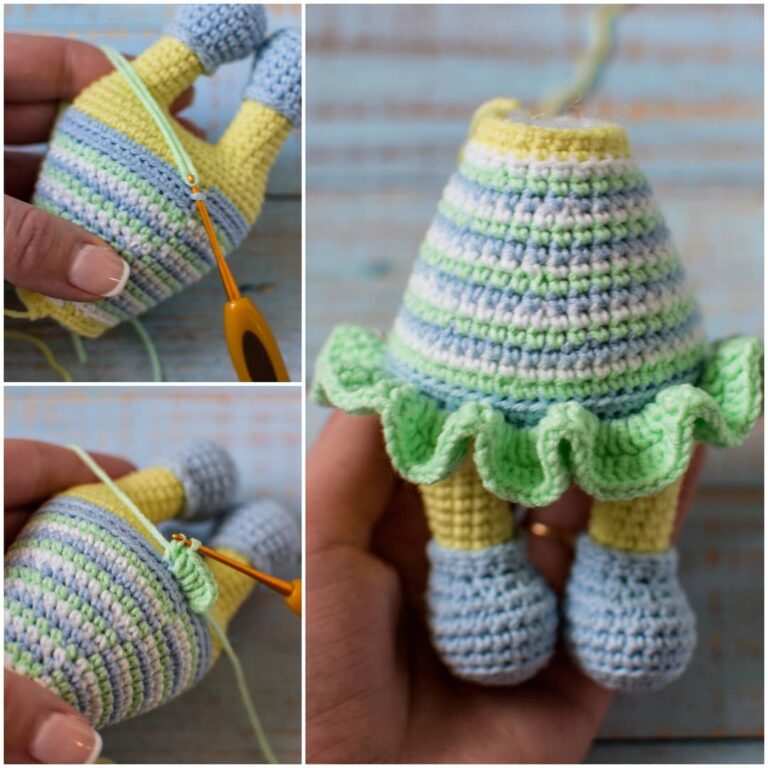
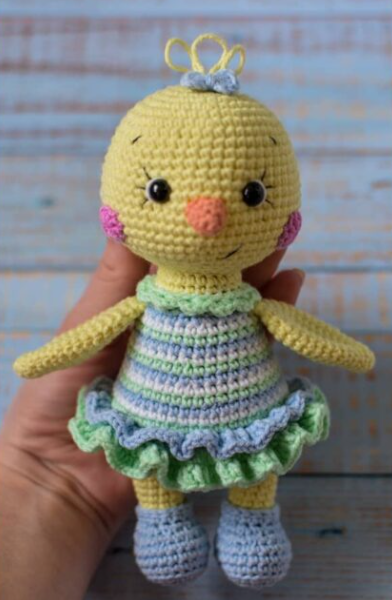
Skirt
First, knit the lower skirt with a green thread.
To do this, we attach the thread to the last free 22nd row septum.
1: 3 bp, 1 abdomen in the same base loop, then in each loop weigh the additives from the bottom to
end of the row, finish the row of ss in the 3rd century.
2: 3 bp, pr from dream, ( 1 dream, pr from sn ) * 53, we finish the series of ss in the 3rd century.
Cut the thread, fix it.
Now we knit the upper skirt with a blue thread.
To do this, we attach the thread to the last free 23rd row septum.
1: 3 bp, 1 dream in the same base loop, then in each loop weigh the additives from the bottom to
end of the row, finish the row of ss in the 3rd century.
Cut the thread, fix it.
Collar
We knit the collar with a green thread. To do this, we attach the thread to the last
free 37th row semi-petula.
1: 1 v.p.p., 1 Sat in the same base loop, 23 Sat, we finish the row of ss in v.p.
2: knit for zpp: 1 vp, ( 1 ab, 1 dream, 1 sbn ) in the same base loop, ss in the following
loop, ( 1 Sat, 1 Sn, 1 Sat ) in 1 loop, ss in the next loop, alternating to the end of the row. A number
finish ss.
Cut the thread, fix it.
At this stage, we try on the decorated head to the body and begin to sew. By
as we sew our neck tightly so that our head does not hang out under our own
weight.
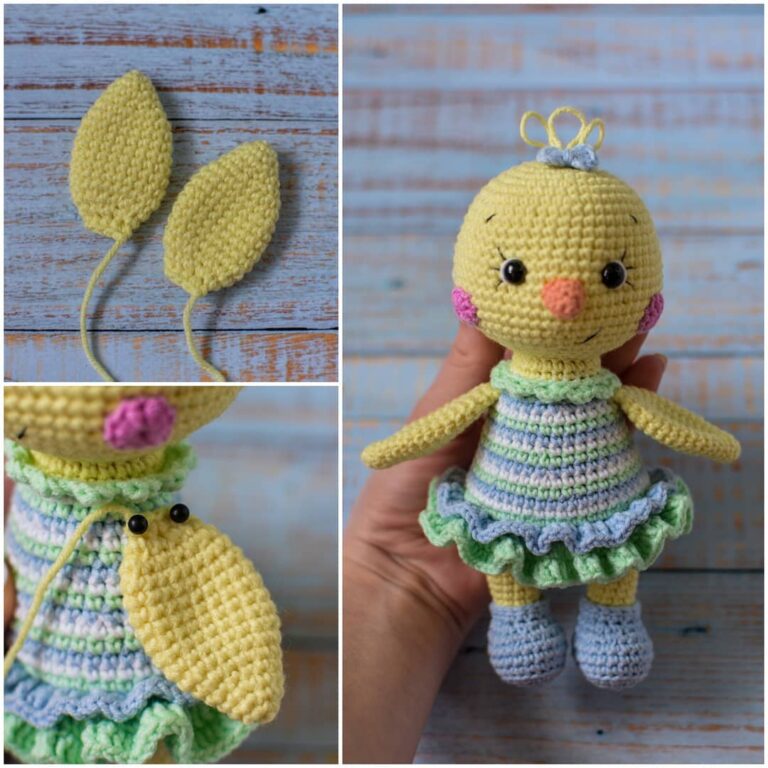
Wings ( 2 details )
We knit the thread of the main color. Do not fill.
1: 6 Sat in KA ( 6 )
2: ( 1 Sat, pr ) * 3 ( 9 )
3: 9 Sat
4: 1 Sat, pr, ( 2 Sat, pr ) * 2, 1 Sat ( 12 )
5: 12 Sat
6: ( 1 Sat, pr ) * 6 ( 18 )
7-14: 18 Sat ( 8 rows )
15: ( 1 Sat, UB ) * 6 ( 12 )
16: ( 1 Sat, UB ) * 4 ( 8 )
We lay the part in half and connect the edges, tying 4 Sat.
Cut the thread, leaving a long end for sewing.
With the help of pins, try on the wings to the body and sew at the level of the 35th row.
It remains a white thread to sew shoelaces, and the chicken is ready!
Feel free to tag me (@freeamigurumii) in your photos on Instagram or Facebook if you’d like!
All Finished.