Hello amigurumi lovers and beautiful visitors, I wanted to share the free amigurumi patterns for you here. In my article I will share 1 pattern and how to make it for you. At the end of my article, I will share amigurumi patterns that can generate ideas for you.
Materials
Cotton yarn in the colors:
Yellow, orange, red, white and pink.
2.5mm crochet hook
Polyfill
Needle
Sewing thread black and white for eyes
Abbreviations
(sc)/(sc): Single crochet
(BO) Hazelnut stitch
(ml)/(ch): Chainette, Air stitch
(MR): Magic ring
(dim)/(dec): decrease, decreasing, decrease
(augm) /(inc): increase
(M)/(st): Stitch (pt) stitch
(FLO): work only in front loops
(BLO): work only in back loops
(d-dc,dble.b)/( tr): Double treble crochet
(br)/(dc): treble crochet
(dB)/(hdc): half treble crochet
(sc)/(sl-st): slip stitch, small stitch
Head and body
Start with the yellow.
Rnd 1. 6 ms en MR
Rnd 2. 6 augm (12)
Rnd 3. (1ms,augm)*6 (18)
Rnd 4. (2ms,augm)*6 (24)
Rnd 5. (3ms,augm)*6 (30)
Rnd 6-10. ms autour (30)
Rnd 11. (4ms,augm)*6 (36)
Rnd 12. (5ms,augm)*6 (42)
Rnd 13-17. ms autour (42)
Rnd 18. (5ms,dim)*6 (36)
Rnd 19. (4ms,dim)*6 (30)
Rnd 20. (3ms,dim)*6 (24)
Remplir.
Rnd 21. (2ms,dim)*6 (18)
Rnd 22. (1ms,dim)*6 (12)
Rnd 23. 6 dim, F.o.
Wings (make 2)
Rnd 1. 6 sc in MR
Rnd 2. 6 inc (12)
Rnd 3. 1 sc, inc (18)
Rnd 4. Fold it in half and make 9 sc in diameter (9)
Sew it on the sides of the body (widest part upwards)
Legs (make 2)
In orange.
Rnd 1. 6 sc in MR
Rnd 2. 6 inc (12)
Rnd 3. sc around (12)
Rnd 4. 6 dec (6)
Rnd 5. Fold in half, 1 sc in the middle and chain 4
Fo, sew on the lower body.
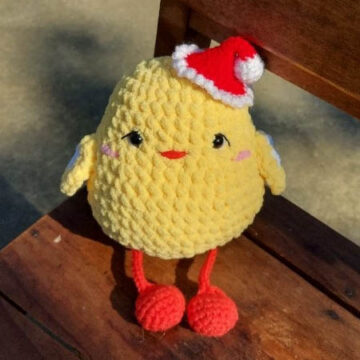
Mini Christmas hat
Start in white.
Rnd 1. 6 sc in MR (6)
Rnd 2. 6 inc (12)
Rnd 3. sc around (12)
Rnd 4. dec 6 times (6)
Go red.
Round 5-8. 6 sc (6)
Rnd 9. (1 sc, inc)*3 (9)
Rnd 10. sc around (9)
Rnd 11. (2 sc, inc)*3 (12)
Switch to white.
Rnd 12. To make the ruffle, chain 3 and sc in the next st, chain 3 and sc in the next st and repeat until the end.
Fo, sew on the side of the head.
Sewing instructions
Sew the eyes between round 7 and round 10.
Beak between round 9 and round 11.
Wings between round 9 and round 14.
Fold the end of the hat and sew to create a curved effect.
Feel free to tag me (@freeamigurumii) in your photos on Instagram or Facebook if you’d like!