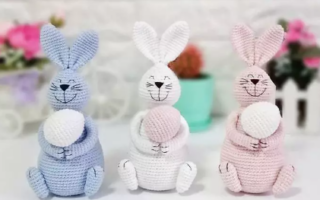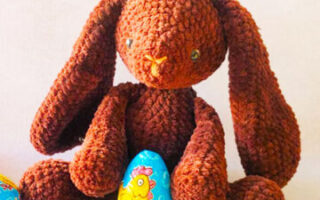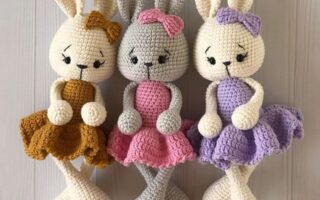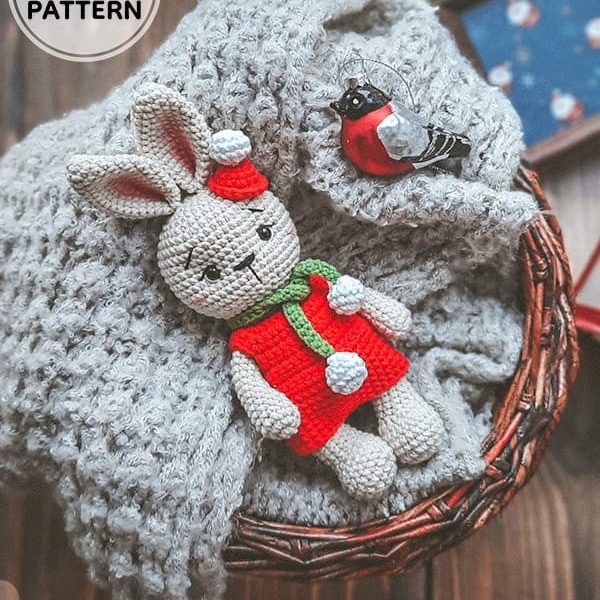
Hello amigurumi lovers and beautiful visitors, I wanted to share free amigurumi models with you here. In my article, I will share with you a model and how to make it. At the end of my article, I will share with you the detailed construction patterns of the mold.
Abbreviations
MR: Magic ring
Ch: Chain
Sc: Single crochet
Inc: Increase
Dec: Decrease
Materials
– YarnArt Jeans, Alize Cotton gold and the like
– Fiber filler
– Crochet hook size: 2mm
– Eyes on a secure mount
– Sewing needle
– Black and white thread for sewing eyes and muzzle decoration
Head
1) 6 sc in MR
2) 6 inc (12sc)
3) (1 sc, inc) *6 (18 sc)
4) 1 sc, inc, (2 sc, inc) *5, 1 sc (24 sc)
5) (3 sc, inc) *6 (30 sc)
6) 2 sc, inc, (4 sc, inc) *5, 2 sc (36 sc)
7) (5 sc, inc) *6 (42 sc)
8) 3 sc, inc, (6 sc, inc) *5, 3 sc (48 sc)
9-16) 48 sc (8 rnds)
17) 3 sc, dec, (6 sc, dec) *5, 3 sc (42 sc)
18) (5 sc, dec) *6 (36 sc)
19) 2 sc, dec, (4 sc, dec) *5, 2 sc (30 sc)
20) (3 sc, dec) *6 (24 sc)
21) 1 sc, dec, (2 sc, dec) *5, 1 sc (18 sc)
Fill. Leave the thread for sewing eyes at the level of 12-13 rows, 9 sc between the eyes (you can arrange as you like).
Upper paws
1) 6 sc in MR
2) 6 inc (12 sc)
3-5) 12 sc
6) dec, 10 sc (11 sc)
7) 11 sc
8) dec, 9 sc (10 sc)
9-16) 10 sc
Fill only the bottom part of the part. Fold and crochet 5 sc. Cut the thread, fasten. If you are sewing on details, leave the thread for sewing.
Lower paws
1) 6 sc in MR
2) 6 inc (12 sc)
3) (1 sc, inc) *6 (18 sc)
4) 1 sc, inc, (2 sc, inc) *5, 1 sc (24 sc)
5-7) 24 sc
8) 6 sc, 6 dec, 6 sc (18 sc)
9) 5 sc, 4 dec, 5 sc (14 sc)
10-18) 14 sc
Crocheting another 1sc, so that when folding the sock evenly looked ahead. Fill only the bottom part of the part.
Fold and knit 7 sc. Cut the thread, fasten. If you are sewing on details, leave the thread for sewing.
Ears (Make 2)
1) 6 sc in MR
2) 6 inc (12 sc)
3) 12 sc
4) (3 sc, inc) *3 (15 sc)
5) 15 sc
6) (4 sc, inc) *3 (18 sc)
7) 18 sc
8) (5 sc, inc) *3 (21 sc)
9) 21 sc
10) (6 sc, inc) *3 (24 sc)
11) 24 sc
12) (6 sc, dec) *3 (21 sc)
13-14) 21 sc
15) (5 sc, dec) *3 (18 sc)
16) -17) 18 sc
Fold in half, then in half again, knit over both edges. Leave the thread for sewing.
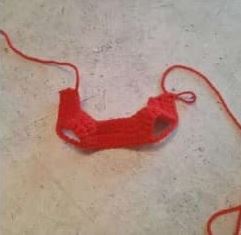
Body
1) 6 sc in MR
2) 6 inc (12 sc)
3) (1 sc, inc) *6 (18 sc)
4) 1 sc, inc, (2 sc, inc) *5, 1 sc (24 sc)
5) (3 sc, inc) *6 (30 sc)
6) 2 sc, inc, (4 sc, inc) *5, 2 sc (36 sc)
7) (5 sc, inc) *6 (42 sc)
8) In this row, knit the lower paws 8 sc, 7 sc with a paw, 12 sc, 7 with a paw, 8 sc (42 sc)
9) We knit the tail. In the first loop, knit 6 double crochets with one top, then to the end of the row 41 sc.
If you don’t know how, don’t understand, or just don’t like it, then the tail can be connected with a separate part like this:
1) 6 sc in MR
2) 6 inc (12 sc)
3) 12 sc. Leave the thread for sewing.
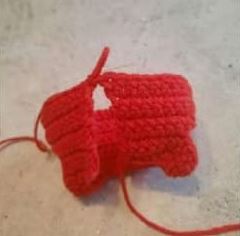
10) 42 sc
11) (5 sc, dec) *6 (36 sc)
12) 2 sc, dec, (4 sc, dec) *5, 2 sc (30 sc)
13-15) 30 sc
16) (3 sc, dec) *6 (24 sc)
17-18) 24 sc
19) Knit upper paws 5 sc, 5 sc with a paw, 7 sc, 5 sc with a paw, 2 sc (24 sc)
These figures may differ for you, check that the paws are exactly on the sides.
20) 1 sc, dec, (2 sc, dec) * 5, 1 sc (18 sc)
Stuff the body, fasten the thread, cut off.
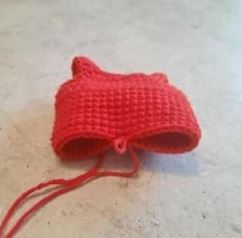
Clothing
For her, you need to take a thinner yarn, or a smaller hook.
We knit in rotary rows, each row starting with 1 ch of lifting.
Make a chain of 30ch + 1ch lifting. When tying on, leave a long end of the thread so that at the end of work you can make a buttonhole from it.
1) From the second loop from the hook: 4sc, inc out of 3 sc, 5sc, inc out of 3 sc, 8sc, inc out of 3 sc, 5sc, inc out of 3 sc, 4sc (38sc)
2) 38sc
3) 5sc, inc out of 3 sc, 7sc, inc out of 3 sc, 10sc, inc out of 3 sc, 7sc, inc out of 3 sc, 5sc (46sc)
4) 7sc, 6ch, skip 9 loops of the previous row, continue knitting into the next loop, 14sc, 6ch, skip 9 loops of the previous row, continue knitting into the next loop, 7sc (40sc)
5-8) 40 sc
9) 5 sc, inc, 28 sc, inc, 5 sc (42 sc)
Connect the slst part and continue to knit in the same way in a circle.
10-14) 42 sc
Divide the loops evenly and knit 2 slst in the middle. Cut the thread, fasten.
Return to the beginning of knitting and make a buttonhole from the remaining thread.
Make the number of ch you need and attach the thread to the row below. Sew on a button.
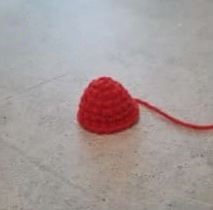
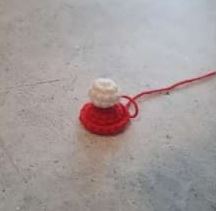
Cap
1) 6 sc in MR
2) 6 inc (12 sc)
3) 12 sc
4) (1 sc, inc) *6 (18 sc)
5) 18 sc
6) 18 sc only for the front wall of the loop. Leave the thread for sewing. Roll up the edge of the cap.
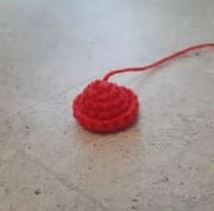
Pompom
1) 6 sc in MR
2) 6 inc (12 sc)
3-4) 12 sc
5) 6 dec
Stuff the part and sew to the cap.
Sew a cap to the bunny’s head.
Scarf
80 ch + 1 lifting loop. Knit 80 sc.
Tie two pompom, like a cap and sew.
Feel free to tag me (@freeamigurumii) in your photos on Instagram or Facebook if you’d like!
All Finished.