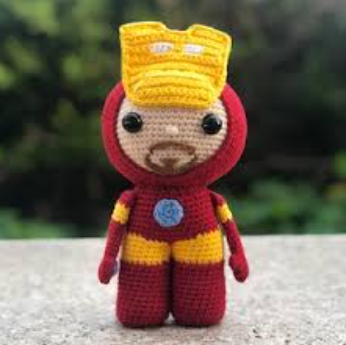
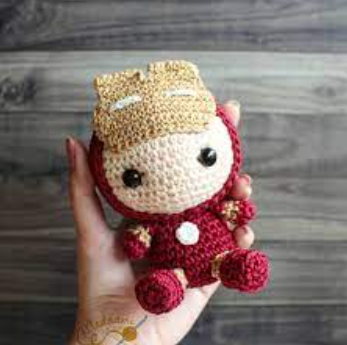
Hello amigurumi lovers and beautiful visitors, I wanted to share the free amigurumi patterns for you here. In my article I will share 1 pattern and how to make it for you. At the end of my article, I will share amigurumi patterns that can generate ideas for you.
Materials:
– The suitable crochet hook under your yarn. I have Clover Soft Touch 2.00mm.
– Wire: colors yellow (35), red (51) and light blue (15). I used “YarnArt Jeans” yarn (160m in 50g, 55% cotton/45% polyacryl).
– 7mm black safety eyes.
– Toy filler.
– Scissors.
– Tapestry needle.
– Pins.
– Point marker.
Abbreviations
(sc)/(sc): Single crochet
(ml)/(ch): Chain, Air stitch
(MR): Magic ring
(dim)/(dec): decrease, decreasing, decrease
(augm)/(inc): increase
(M)/(st): Stitch (pt) stitch
(FLO): work only in front loops
(BLO): work only in back loops
(d-dc,dble.b)/(tr): Double treble crochet
(br)/(dc): treble crochet
(dB)/(hdc): half treble crochet
(sc)/(sl-st): slip stitch, small stitch
(db / dbr) (dtr): double treble crochet
(mct)/( tch): chain stitches to turn
(3msm)/(sc3tog): 3 ms in the same stitch
(Fo): Stop the thread.
Leg 1:
Start working with red yarn.
R1. 6ms MR(6)
R2. 6 increase (12)
R3. (1 sc, inc)x6 (18)
R4. 18 ms (18)
R5. 6 sc, 4 dec, 4 sc (14)
R6. 6 sc, 2 dec, 4 sc (12)
R7. 12 sc (12)
Continue with light blue.
A8. – R10. 12ms (12)
R11. Only 11 sc (12)
Close and break the thread.
Leg 2 + body:
Start working with red yarn.
R1. 6ms MR(6)
R2. 6 increase (12)
R3. (1 sc, inc)x6 (18)
R4. 18 ms (18)
R5. 6 sc, 4 dec, 4 sc (14)
R6. 6 sc, 2 dec, 4 sc (12)
R7. 12 sc (12)
Continue with light blue.
A8. – R10. 12ms (12)
R11. 12 sc (12) Do not cut the thread. Crochet 5 sc.
Move the marker to the last loop. Complete the legs.
Now we’ll start with the body.
R12. ch 3, 12 sc, 3 sc, 12 sc (30) *this means we sew 3 ch and attach the sc to the second leg (first loop of the new row), then crochet 11 sc in the circle, 3 sc in the loop of these 3 air loops and 12 sc along the circle of the second leg.
Total 30ms. The legs should be “facing” you.
R13. 9 sc, inc, 14 sc, inc, 5 sc (32) *inc should be in the sides.
R14. – R18. 32ms (32)
R19. 9 sc, Sun, 14 sc, Sun, 5 sc (30)
R20. 30ms (30)
R21. (3 sc, dec)x6 (24)
R22. – R23. 24 sc (24)
Start filling in the body.
R24. (2 sc, dec)x6 (18)
R25. – R26. 18ms (18)
R27. (4 sc, dec)x3 (15)
R28. 15 sc (15) Cut the thread.
Firmly fill the body.
Arm x2:
Crochet with red.
R1. 6ms MR(6)
R2. (2 sc, inc)x2 (8)
R3. – R6. 8 sc (8)
Complete only half of the arms.
Continue in light blue.
A7. – R14. 8 sc (8)
Do not fill arms.
This way the arm doesn’t stick out too much after sewing it to the body.
Press the opening with your fingers, lining up 3 dots side by side.
Break the thread and leave a long tail to sew the arms to the body.
Head:
Crocheter avec du fil bleu clair.
R1. 6 ms MR (6)
R2. 6 augm (12)
R3. (1 ms, augm)x6 (18)
R4. (2 ms, augm)x6 (24)
R5. (3 ms, augm)x6 (30)
R6. (4 ms, augm)x6 (36)
R7. (5 ms, augm)x6 (42)
R8. (6 ms, augm)x6 (48)
R9. (7 ms, augm)x6 (54)
R10. 54 (54 ms)
Now we get into the head color change part.
Below are the written instructions along with the chart for reference.
R11. light blue 13 ms, red 4 ms, light blue 7 ms, red 4 ms, light blue 26 ms (54)
R12. bleu clair 12 ms, rouge 6 ms, bleu clair 5 ms, rouge 6 ms, bleu clair 25 ms (54)
R13. bleu clair 11 ms, rouge 8 ms, bleu clair 3 ms, rouge 8 ms, bleu clair 24 ms (54)
R14. bleu clair 11 ms, rouge 9 ms, bleu clair 1 ms, rouge 9 ms, bleu clair 24 ms (54)
R15. – R20. bleu clair 11 ms, rouge 19 ms, 24 ms (6 rounds) (54)
R21. bleu clair 7 ms, dim, 2 ms, rouge 5 ms, dim, 7 ms, dim, 3 ms, bleu clair 4 ms, dim, (7 ms, dim)x2 (48)
R22. bleu clair 6 ms, dim, 2 ms, rouge 4 ms, dim, 6 ms, dim, 3 ms, bleu clair 3 ms, dim, (6 ms, dim)x2 (42)
R23. bleu clair 5 ms, dim, 2 ms, rouge 3 ms, dim, 5 ms, dim, 3 ms, bleu clair 2 ms, dim, (5 ms, dim)x2 (36)
R24. bleu clair 4 ms, dim, 2 ms, rouge 2 ms, dim, 4 ms, dim, 3 ms, bleu clair 1 ms, dim, (4 ms, dim)x2 (30)
Place safety eyes between towers 16 and 17, 9m apart.
R25. light blue 3 sc, dec, 2 sc, red 1 sc, dec, 3 sc, dec, 3 sc light blue dec, (3 sc, dec)x2 (24) Fill the head
.
R26. light blue 2 sc, dec, 2 sc, red dec, 2 sc, dec, 2 sc, light blue dec, (2 sc, dec)x2 (18) Continue with light blue
.
R27. (4 sc, dec)x3 (15)
Leave a long tail for sewing.
Crystal:
With white yellow.
R1. 5 sc MR, sl st (5) Break the thread and leave a tail.
Waterproof:
Start working with yellow yarn.
R1. 18 ch, from second ch from hook, 17 hdc (17)
R2. – R7. ch, turn, 17 hdc (17)
R8. ch, turn, dim, 13 hdc, dim (15)
R9. ch, turn, 15 dB (15)
R10. ch, turn, dec, 11 hdc, dec (13)
R11. ch, turn, 13 hdc (13)
R12. ch, turn, dec, 9 hdc, dec (11)
R13. ch, turn, dim, 7 hdc, dim (9)
R14. ch, turn, dim, 5 hdc, dim (7)
R15. ch, turn, dim, 3 hdc, dim (5)
R16. ch, turn, dec, 1 hdc, dec (3)
For a neater finish, sc around the outside of the raincoat.
Put 2 sc in each corner to help turn and prevent corners from rounding.
Crochet 17 ch to attach a raincoat to a collar.
Break the thread and leave a long tail.
Finishing :
1. Sew the head to a body. For stability, I sew about twice. Don’t forget to add some padding to make sure there are no gaps.
2. Sew the arms to the body symmetrically.
3. Sew the crystal between rows 13 and 15 of the head. This should be where the lowest point of the blue meets the red between the eyes.
4. Tie the cape around the neck. Secure the chained part with two stitches if red thread under the head.
Feel free to tag me (@freeamigurumii) in your photos on Instagram or Facebook if you’d like!
All Finished.