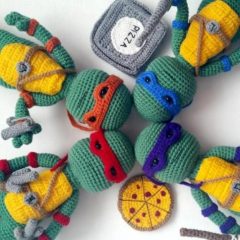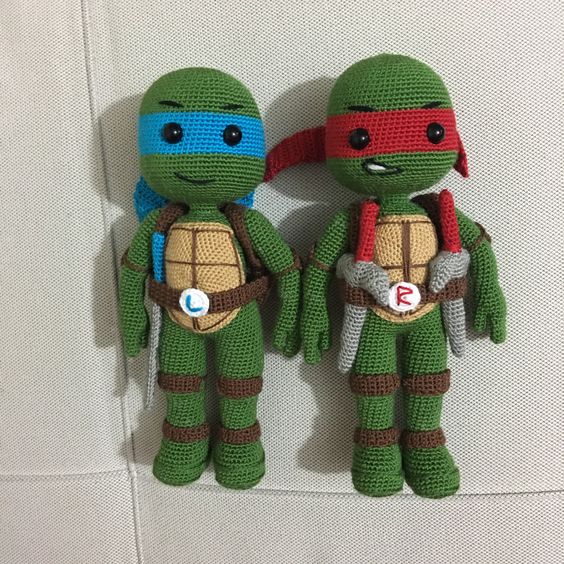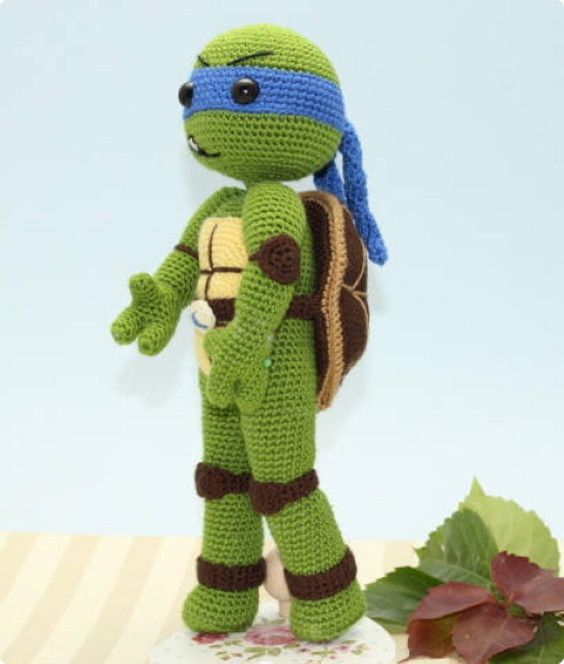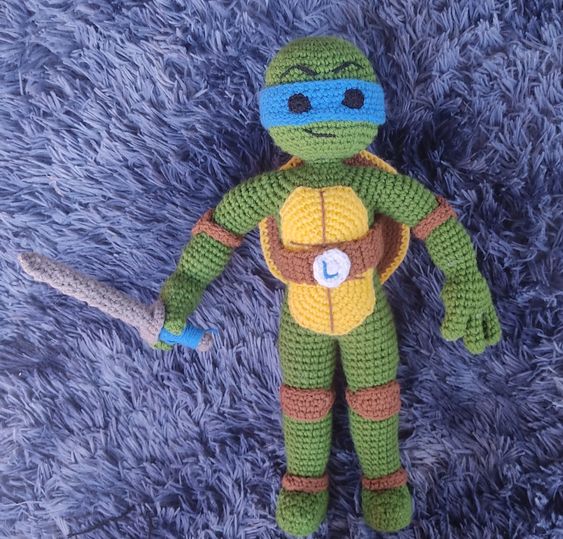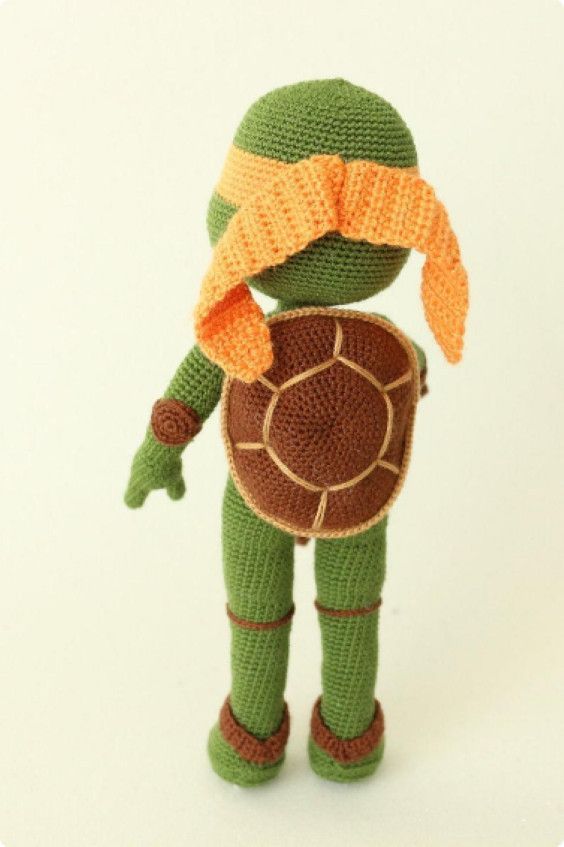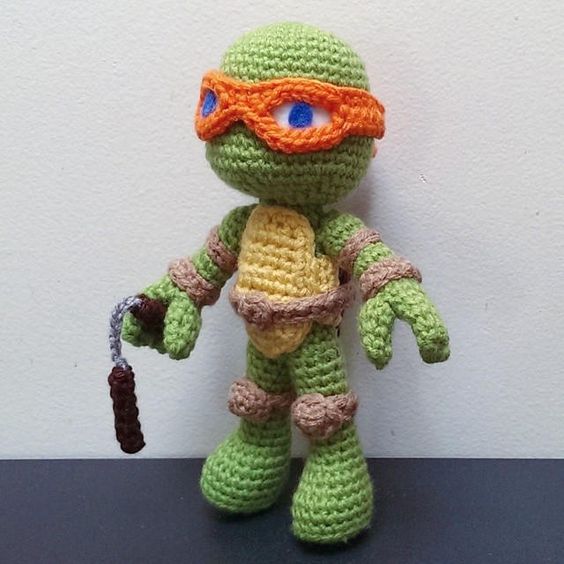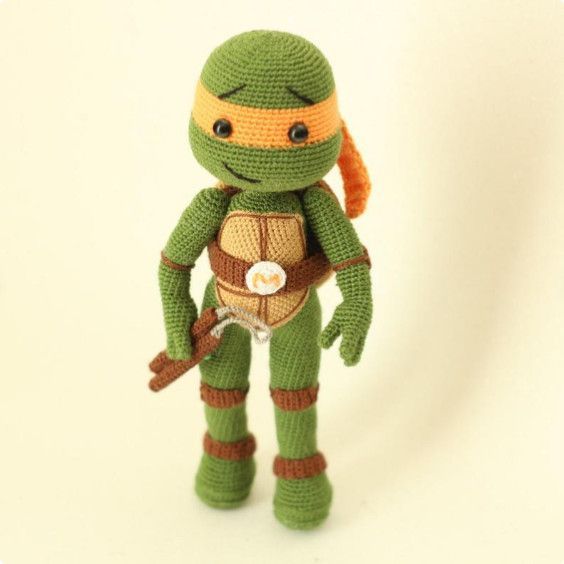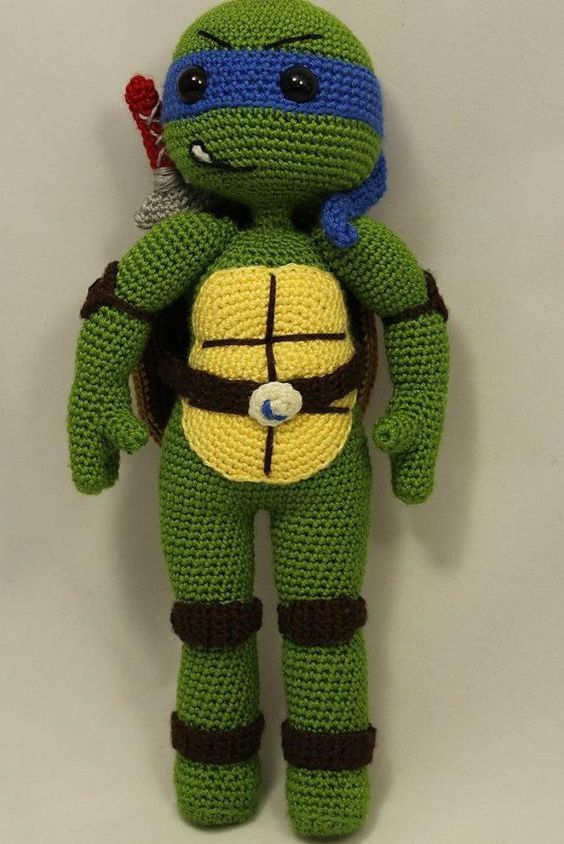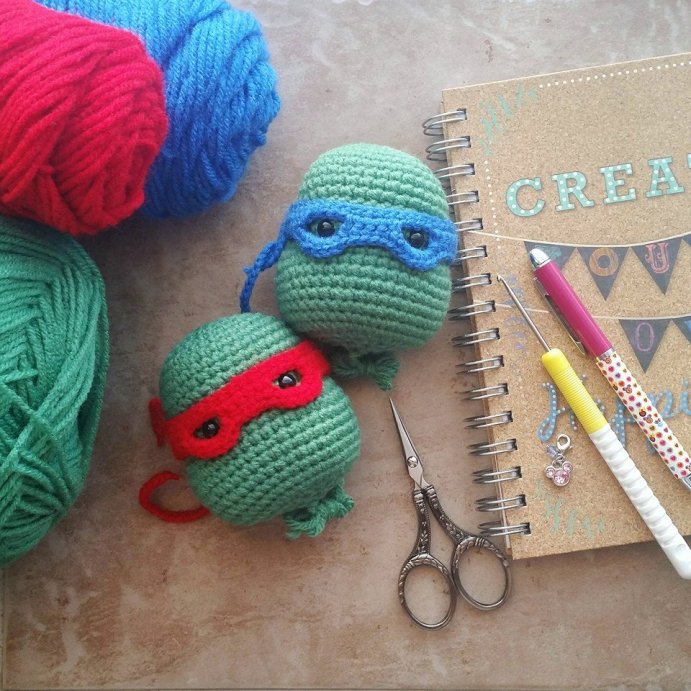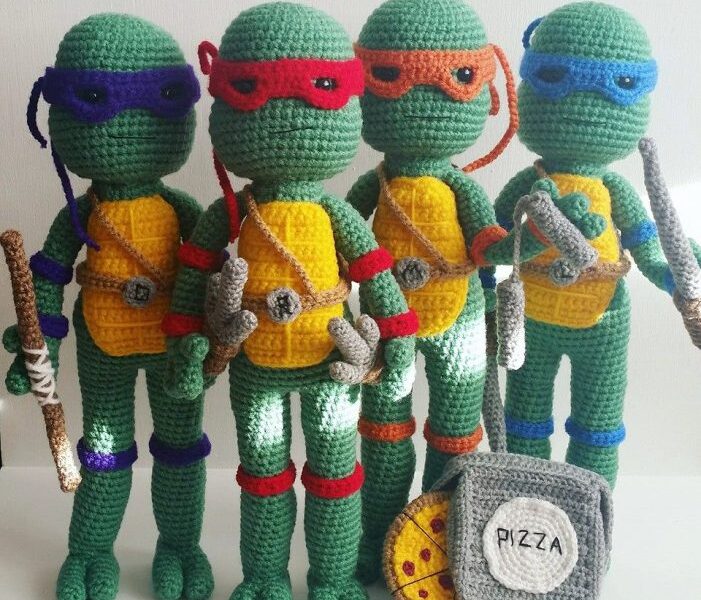
Hello amigurumi lovers and beautiful visitors, I wanted to share the free amigurumi patterns for you here. In my article I will share 1 pattern and how to make it for you. At the end of my article, I will share amigurumi patterns that can generate ideas for you.
Materials:
- crochet hook 2.5 mm;
- eyes 8 mm;
- Red Heart Comfort yarn in green, Red Heart super saver yarn in yellow, blue, purple, red, grey, brown, tan and white;
- 1.25mm crochet hook and red embroidery thread to make pepperoni on pizza.
Note: I only use one pattern to knit all 4 turtles.
Abbreviations:
VP – chain loop
RLS – single crochet
Increment – two RLS knitted into one base loop
Decrease – two RLS knitted together
HDC – half double crochet
Decrease (HDC) – 2 hdc knitted together
Head
Row 1: Start knitting with green thread from the top of the turtles’ head by knitting 6 sc in an adjustable ring (6)
Row 2: 6 Inc (12)
Row 3: 12 Inc (24)
Row 4: 24 Sc (24)
Row 5: [ RLS, Increase]*12 times (36)
Row 6-11: 36 RLS (36)
Row 12: 3 RLS, [8 RLS, Decrease]*3 times, 3 RLS (33)
Row 13: On this row you will insert the eyes. Work 11 sc, place the eye in the stitch you just made, or use a crochet marker to come back to that spot and insert the eye later, then 7 sc, place the other eye in the stitch you just made, 15 sc ( 33)
Row 14: 5 RLS, 3 Increments, 11 RLS, 3 Increments, 11 RLS (39)
Row 15: 7 RLS, 3 Increments, 13 RLS, 3 Increments, 13 RLS (45)
Row 16-17: 45 RLS ( 45)
Row 18: 8 RLS, Decrease, 2 RLS, Decrease, 15 RLS, Decrease, 2 RLS, Decrease, 10 RLS (41) Row
19-22: 41 RLS (41)
Row 23: RLS, 20 Decrease (21)
Row 24: SC, 10 Decrease (11)
Row 25: Stuff the head tightly, SC, 5 Decrease (6)
Row 26: 3 Decrease, fasten the thread (3)
Body
Row 1: Start knitting from the neck with a green thread, work 24 ch and join (24)
Row 2-5: 24 sc (24)
Row 6: [3 sc, increase]*6 times (30)
Row 7-9: 30 RLS (30)
Row 10: 5 RLS, 5 Increases, 9 RLS, 5 Increments, 6 RLS (40)
Row 11-13: 40 RLS (40)
Row 14: 9 RLS, Decrease, 2 RLS, Decrease, 12 RLS, Decrease, 2 sc, Decrease, 7 sc (36)
Row 15-18: 36 sc (36)
Row 19: Now you start knitting the first leg, sc, skip 18 loops, 17 sc (18)
Row 20-23: 18 sc (18)
Row 24: [4 sc, Dec]*3 times (15)
Row 25-32: 15 sc (15)
Row 33: You start knitting the shin, 13 sc, 2 Inc (17)
Row 34: 2 Inc , 15 RLS (19)
Row 35-39: 19 RLS (19)
Row 40: [RLS, Decrease]*2 times, 11 RLS, Decrease (16)
Row 41: Decrease, 14 RLS (15)
Row 42-44: 15 sc, fasten the thread (15)
Toes/Foot (2 toes on each foot)
Row 1: Take green yarn and work 6 sc into an adjustable ring (6)
Row 2: [Inc, 2 sc]*2 times (8)
Row 3-5: 8 sc (8)
Row 6: Increase, 7 sc, fasten the thread (9)
Note, do not secure the thread when you knit the second finger. Continue knitting the 7th row, the description of which follows below.
Row 7: Now you have both toes done and you can continue knitting the foot. Hold both fingers together and tie them in a circle with 18 sc (18).
Row 8: 18 sc (18)
Row 9: sc, [sc, dec]*5 times, 2 sc (13)
Row 10-13: 13 sc (13)
Row 14: sc, 6 Dec (7)
Row 15: Stuff the foot tightly, now make 3 decreases, secure the thread (3)
Repeat the same for the second foot.
Second Leg
Row 1: With the back of your doll turned upside down, sc in the first stitch to the left of the first leg, 17 sc (18)
Row 2-3: 18 sc (18)
Row 4: [4 sc, Dec]* 3 times (15)
Row 5-14: 15 sc (15)
Row 15: 5 sc, 4 increase, 6 sc (19)
Row 16-20: 19 sc (19)
Row 21: 6 sc, 3 decrease, 7 sc (16)
Row 22: 6 sc, decrease, 8 sc (15)
Row 23-26: 15 sc, fasten the thread at the end of the 26th row (25)
Fingers / Hand (2 fingers on each hand)
Row 1: Using green thread, tie 6 sc into an adjustable ring (6)
Row 2: Increase, 5 sc (7)
Row 3: 7 sc (7)
Row 4: Decrease, 5 Sc (6)
Row 5: 6 Sc, fasten the thread (6)
Note, do not secure the thread when you work on the second finger. Continue knitting the 6th row, the description of which follows below.
Row 6: Hold both fingers together and work around the 12th sc (12)
Row 7-9: 12 sc (12)
Row 10: [2 sc, Dec]*3 times (9)
Row 11-19: 9 RLS (9)
Row 20: RLS, [3 RLS, Increase]*2 times (11)
Row 21-24: 11 RLS (11)
Row 25: RLS, [3 RLS, Increment]*2 times (9)
Row 26 -27: 9 sc, fasten the thread at the end of the 27th row (9)
Thumb (make 2 pieces)
Row 1: Using green thread, tie 6 sc into an adjustable ring (6)
Row 2-4: 6 sc, fasten the thread at the end of the 4th row (6)
Front part of the shell
Row 1: Using yellow thread, cast on a chain of 10 ch (10)
Row 2: Turn work, ch, 9 sc (9)
Row 3: Turn work, ch, increase, 7 sc, increase (11)
Row 4: Turn work, VP, 11 RLS (11)
Row 5: Turn work, VP, Increase, 9 RLS, Increment (13)
Row 6-10: Turn work, VP, 13 RLS (13)
Row 11: Turn work, VP, Decrease , 9 RLS, Decrease (11)
Row 12-16: Turn work, VP, 11 RLS (11)
Row 17: Turn work, VP, Decrease, 7 RLS, Decrease (9)
Row 18: Turn work, VP, Decrease, 5 SC, Decrease (7)
Row 19: Do not turn the work, tie the entire piece in a circle with single crochets, secure the thread.
Back of the shell
Row 1-18: Using brown thread, do the same as for the front of the shell. Place a crochet marker in the last stitch of row 18.
Row 19: Do not turn the work, tie the entire piece in a circle with single crochets to a loop with a marker, 50 sc
Row 20-21: 51 sc, fasten the thread at the end of the 21st row (51)
Headband
Row 1: Using a colored thread of your choice, work a chain of 30 ch
Row 2: Turn work, 29 sc (29)
Row 3: Turn work, ch, 9 sc, 7 ch, skip 3 loops, 5 sc, 7 ch , skip 3 loops, 9 RLS (37)
Row 4: Turn work, VP, 9 RLS, 7 RLS into an arch of 7 VPs, 5 RLS, 7 RLS into an arch of 7 VPs, 9 RLS, fasten the thread (37)
Elbow bandage (2 pieces)
Row 1: Using a colored thread of your choice, knit a chain of 14 chs (14)
Row 2: Turn work, 13 sc, secure the thread (13)
Wrist band (2 pieces)
Row 1: Using a colored thread of your choice, knit a chain of 17 chs (17)
Row 2: Turn work, 16 sc, secure the thread (16)
Knee bandage (2 pieces)
Row 1: Using a colored thread of your choice, knit a chain of 23 chs (23)
Row 2: Turn work, 22 sc, secure the thread (22)
Belt
Row 1: Use a light brown thread to tie a chain of 52 chs (52)
Row 2: Turn the work, 51 sc, secure the thread (51)
Shoulder strap for belt
Row 1: Use a light brown thread to tie a chain of 38 chain stitches, secure the thread (38)
Belt buckle
Row 1: Using white thread, tie 6 sc into an adjustable ring (6)
Row 2: Increase 6, secure the thread (12)
Stick
Row 1: Using brown thread, tie 5 sc into an adjustable ring (5)
Row 2-34: 5 sc, fasten the thread at the end of the 34th row (5)
Nunchakus (2 pieces)
Row 1: Using gray thread, tie 6 sc into an adjustable ring (6)
Row 2: [Inc, sc]*3 times (9)
Row 3: 9 sc, tied behind the back walls of the loops (9)
Row 4: 3 RLS, Decrease, 4 RLS (8)
Row 5-14: 8 RLS, fasten the thread at the end of the 14th row (8)
End part nunchuk (2 pieces)
Row 1: Using gray thread, tie 6 sc into an adjustable ring (6)
Chain for nunchuk
Row 1: Use a gray thread to tie a chain of 17 VPs, secure the thread (17)
Sword (2 pieces)
Row 1: Using gray thread, tie 5 sc in an adjustable ring (5)
Row 2-6: 5 sc (5)
Row 7: Increase, 4 sc (6)
Row 8-13: 6 sc (6)
Row Row 14: Inc, 5 sc (7)
Row 15: 7 sc (7)
Row 16: 3 sc, Inc, 3 sc (8)
Row 17-27: 8 sc (8)
Row 28: [3 sc, Inc]* 2 times (10)
Row 29: 10 sc (10)
Row 30: Change the thread to brown and work 10 sc (10)
Row 31: [Inc, 4 sc]*2 times (12)
Row 32-34: 12 sc ( 12)
Row 35: Decrease, 10 sc (11)
Row 36: Decrease, 9 sc, fasten the thread (10)
Bottom of the sword
Row 1: Using brown thread, tie 6 sc into an adjustable ring (6)
Row 2: [Inc, sc]*2 times, secure the thread (8)
Sword edging
Row 1: Using a brown thread, tie a chain of 13 VP (13)
Row 2: Turn the work, 12 RLS (12)
Row 3: Turn the work, VP, 12 RLS, secure the thread (12)
Daggers – sai (large, medium prong)
Row 1: Begin knitting with gray thread and tie 6 sc in an adjustable ring (6)
Row 2: Increase, 5 sc (7)
Row 3-12: 7 sc, fasten the thread at the end of the 12th row (7)
Daggers – sai (small prong, two for each dagger)
Row 1: Using gray thread, tie 6 sc in an adjustable ring (6)
Row 2-6: 6 sc, fasten the thread at the end of the 6th row only on the first prong (6)
Note, do not secure the thread when you knit the second prong. Continue knitting the 7th row as described below.
Row 7: Hold all three prongs together and work all three prongs into 15 sc (15)
Row 8: 15 sc (15)
Row 9: Change yarn to brown and work [3 sc, Dec]*3 times (12)
Row 10: 12 sc (12)
Row 11: [sc, dec]*4 times (8)
Row 12-14: 8 sc, fasten to end of row 14 (8)
Bottom of daggers
Row 1: Using brown thread, tie 6 sc into an adjustable ring (6)
Edging the daggers
Row 1: Use a brown thread to tie a chain of 14 chs (14)
Row 2: Turn the work, 13 sc, secure the thread (13)
Pizza base
Row 1: Using a light brown thread, tie 6 sc into an adjustable ring (6)
Row 2: 6 Increase (12)
Row 3: [Sc, Inc]*6 times (18)
Row 4: [Inc, Sc]*9 times (27)
Row 5: 27 sc (27)
Row 6: [2 sc, increase]*9 times (36)
Row 7: [sc, increase]*18 times (54)
Row 8: 54 sc (54)
row 9: 54 sc, tied behind the back walls of the loops (54)
Row 10: [4 sc, increase]*10 times, 3 sc, increase (65)
Row 11: 65 sc, fasten the thread (65)
Cheese
Row 1: Using yellow thread, tie 6 sc into an adjustable ring (6)
Row 2: 6 Inc (12)
Row 3: [Sc, Inc]*6 times (18)
Row 4: [Sc, Inc, Sc]*6 times (24)
Row 5: [3 sc, Inc.]*6 times (30)
Row 6: [4 sc, Inc.]*6 times, fasten the thread (36)
Pepperoni (small pieces)
Row 1: Using a 1.25mm crochet hook and embroidery thread, work 6 sc into an adjustable ring (6)
Pepperoni (large pieces)
Row 1: Do the same as for small pieces
Row 2: 6 Increases, fasten off thread (12)
Pizza Box
Row 1: Using gray thread, cast on a chain of 23 chs (23)
Row 2: Turn work, 22 hdc (22)
Row 3-15: Turn work, ch 22 hdc, place crochet marker in last stitch 15 1st row (22)
Row 16: Do not turn the work, knit sc around the entire piece to the loop with a marker, 77 sc (77)
Row 17: Knit this entire row behind the back walls of the loops, 10 hdc, decrease (hdc), 12 hdc, decrease (hdc), 12 hdc, decrease (hdc), 10 hdc, decrease (hdc), 15 hdc, decrease (hdc), 6 hdc, decrease (hdc), 3 hdc (74) Row 18: 74
hdc ( 74)
Row 19: Now you begin to knit the box lid, hdc, turn, ch, 17 hdc, tied behind the front walls of the loops (18)
Row 20-31: Turn work, ch, 17 hdc, fasten the thread at the end of the 31st row (17)
Box lid edges
Row 1: Insert hook into corner of box top and sc around entire lid, 55 sc (55)
Row 2: 55 sc behind front loops (55)
Row 3-4: 55 sc, secure at end of 4- 1st row (55)
Circle at the top of the box
Row 1: Using white thread, tie 6 sc into an adjustable ring (6)
Row 2: 6 Inc. (12)
Row 3: [Inc, sc]*6 times (18)
Row 4: [2 sc, Inc]*6 times (24)
Row 5: [3 sc, increase]*6 times (30)
Row 6: [2 sc, increase, 2 sc]*6 times (36)
Row 7: 3 sc, [2 sc, increase]* 10 times, 3 sc, secure the thread (46)
Assembly
To assemble the turtle, stuff the body, then sew the head to the body. Sew on the legs and arms. Sew on the front and back of the shell, as well as the strap and shoulder strap for the belt. Sew bandages onto elbows, wrists and knees. Embroider the eyebrows and mouth. To assemble the accessories, sew the bottom, closing parts, edgings and handles. When assembling the pizza, sew the pepperoni onto the cheese and the cheese onto the pizza base. Sew black lines onto the pizza to indicate the slices. Sew the word “pizza” onto a white circle, and then sew the white circle onto the lid of a pizza box.
Feel free to tag me (@freeamigurumii) in your photos on Instagram or Facebook if you’d like!
All Finished.